Have you ever tried to selectively remove content from a PDF file? There are a number of ways you can approach that:
- Use “Tools>Edit PDF>Edit” and select the content in question, then press the Delete key
- Use the “Contents” navigation pane (View>Show/Hide>Navigation Panes>Content), then find the content element in the tree and hit the Delete key
- Use “Tools>Print Production>Edit Object”, select the object and hit the Delete key
There are probably more methods than these three that involve pointing and clicking, but regardless of which one you pick, it will be a lot of work to do this with many similar items. And, sometimes it seems to be impossible to select the one item you are interested in.
Acrobat’s Preflight function is a very powerful tool with many different use cases: You can check files for conformance with certain PDF standards, you can identify problems in PDF files, you can fix certain problems in PDF documents, and more. Just recently I wrote about a way to use Preflight to scale page content. Let me add a quick warning here: Preflight is only available in Adobe Acrobat Pro, it’s not part of Acrobat Standard.
Preflight can also help us with removing unwanted content. Let’s say we have a document that somebody marked up with red lines, and then flattened the document so that the markups are no longer comments that can be removed, but static PDF content:
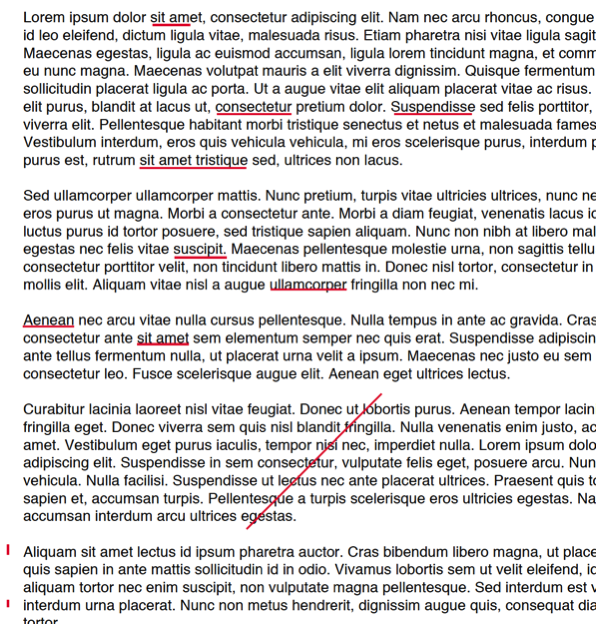
How do we remove all red lines in e.g. a 100 page document without having to click on every single one of these line segments?
Preflight to the Rescue!
Before we can create a Preflight “FixUp” to remove these lines, we need to figure out how we can “describe” them to Preflight so that it does “know” which ones to remove, and what to leave behind. In this example, I will assume that all we need is to know that it’s a line, and that the color is a certain shade of gray. If that is not sufficient (e.g. because you have lines with different line width values, and some of them should be removed, and others should remain in the document), you will have to adjust the rules to identify the objects that should be removed.
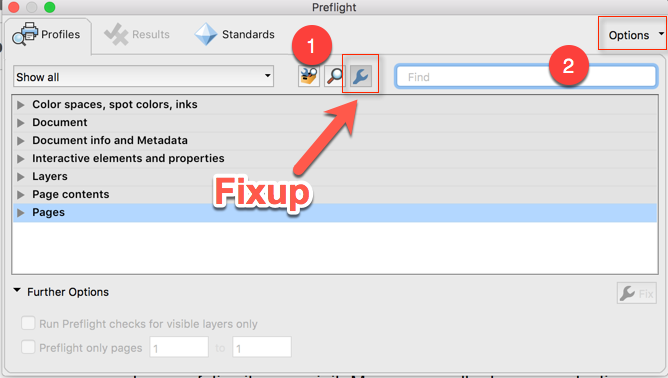
The first thing we need to know is that what we want to do is hidden in the “Fixup” category in Preflight. When you bring up the Preflight tool, there are three different categories to choose from:
- Profiles
- Checks
- Fixups
Profiles are complex things that can do many different things at the same time, Checks are tests for a certain condition (we will create a Check further down to identify our red lines), and Fixups are changes to a PDF document, whereas each Fixup contains one specific modification.
To create our new Fixup, we need to select the “Fixup” category, and then click on the “Options” menu:
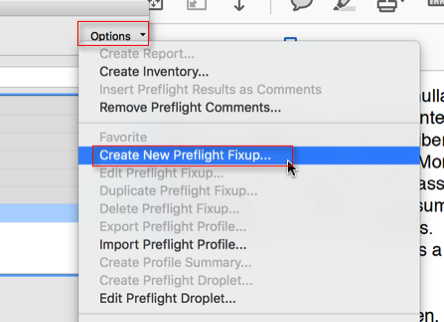
From the “Options” menu, we select to “Create New Preflight Fixup”:
This will open a new editor window. The first thing we need to do is to specify a meaningful name for our new Fixup (e.g. “Remove Red Lines”). The second step requires us to know that removing objects is in the “Pages” category, so we select “Pages”, and then the “Remove Objects” type of fixup:
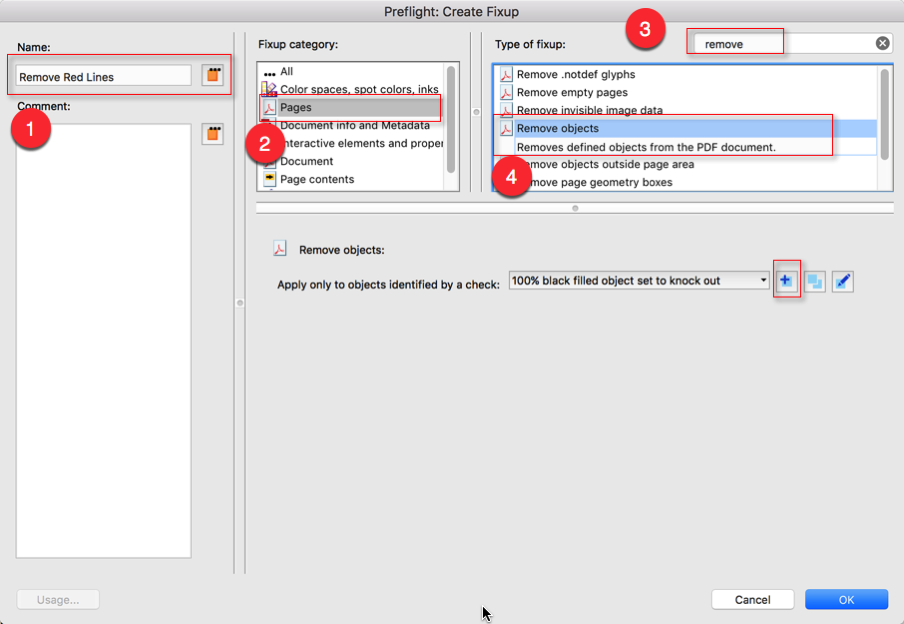
To speed things up a bit, we can search for the term “remove” in the “Type of fixup” table, so that we don’t have to scroll through the whole list. For now, we leave the lower portion of this dialog alone. We will change the type of object to remove in the next step.
When you browse through the list that is associated with the “Apply only to objects identified by a check” selection, you will find a huge number of different checks, but none that would select just red lines:
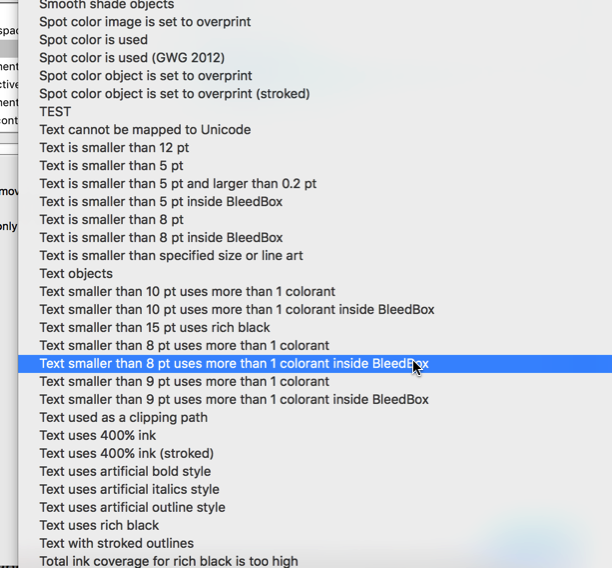
This means that we need to build our own “Check”, and we do this by clicking on the button that adds a new check – that is step #5 in the screenshot above.
The next dialog follows the same pattern as the previous one: We select a meaningful name for this check, and then try to describe our red lines:
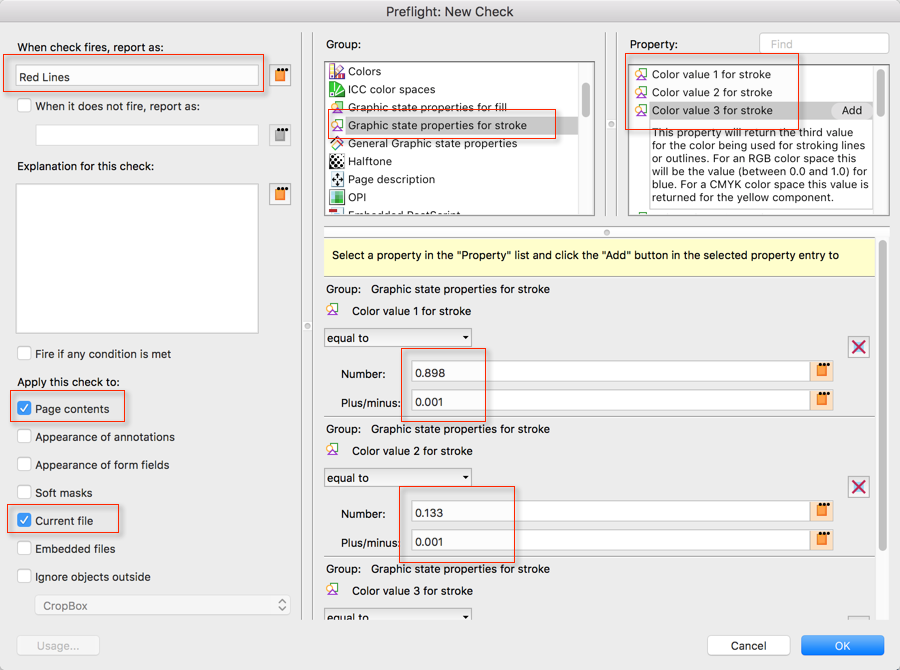
We need to add the following rules (the list contains elements in the format “Group > Item”):
- Page Description > Is Line
- Graphic State Properties for Stroke > Color Value 1 for Stroke
- Graphic State Properties for Stroke > Color Value 2 for Stroke
- Graphic State Properties for Stroke > Color Value 3 for Stroke
Sounds pretty straight forward, but the problem now is to determine the correct components for the color values. I cheated a bit in the list above: I already assumed that we were dealing with a color that uses three components. This is only true for RGB colors. Colors represented as CMYK values use four components, and grayscale ‘colors’ require just one component.
So, how do we find out what these components are? Let’s save our Fixup for now, and pick it up later.
Object Inspector
In order to find out more about these red lines, we need to “inspect” the properties of one of the instances. The tool for this is the “Object Inspector”, which is part of the “Output Preview” tool (Tools > Print Production > Output Preview):
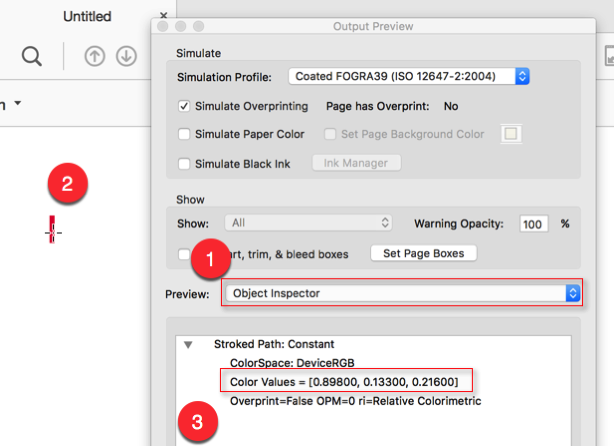
The “Object Inspector” is one of the well hidden secrets in Acrobat, and to expose it, we need to set the “Preview” type to “Object Inspector”, then we can select an item in the PDF file (e.g. our red line), and then see the properties of the item. In this case, we are interested in the color values, which the tool reports as a triplet of values (hence the three values we added to our Preflight Check):
- First value, or R(ed) = 0.89800
- Second value, or G(seen) = 0.13300
- Third value, or B(lue) = 0.21600
These are our RGB values we need to get into the Preflight Check. When we take a closer look at these numbers, we see that we are dealing with three significant decimals, sometimes you see more, but I usually limit myself to rounding to and using just three decimals.
Let’s continue with our Preflight Fixup. To find the one we left unfinished, we can search for part of the name that we’ve used (e.g. search for “Red”). Once located, we select to edit it:
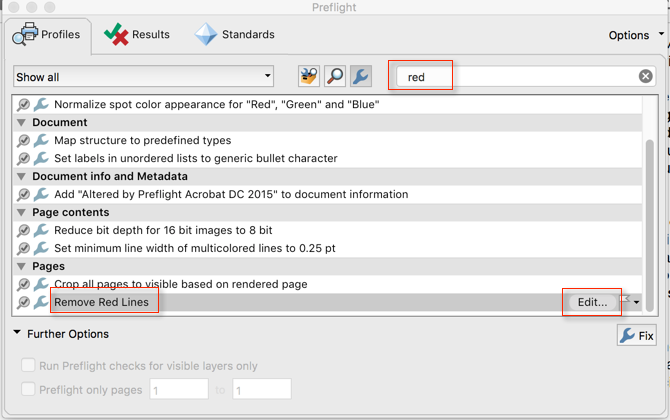
On the Fixup dialog, we then select to edit the Check we’ve been working on:

And now, we can fill in the missing information. The three color values are specified as a number, and a small plus/minus difference, so that numbers close to what we specific will still be treated the same way. Because of rounding problems, I use three significant decimals, and then specify a +/- 0.001:
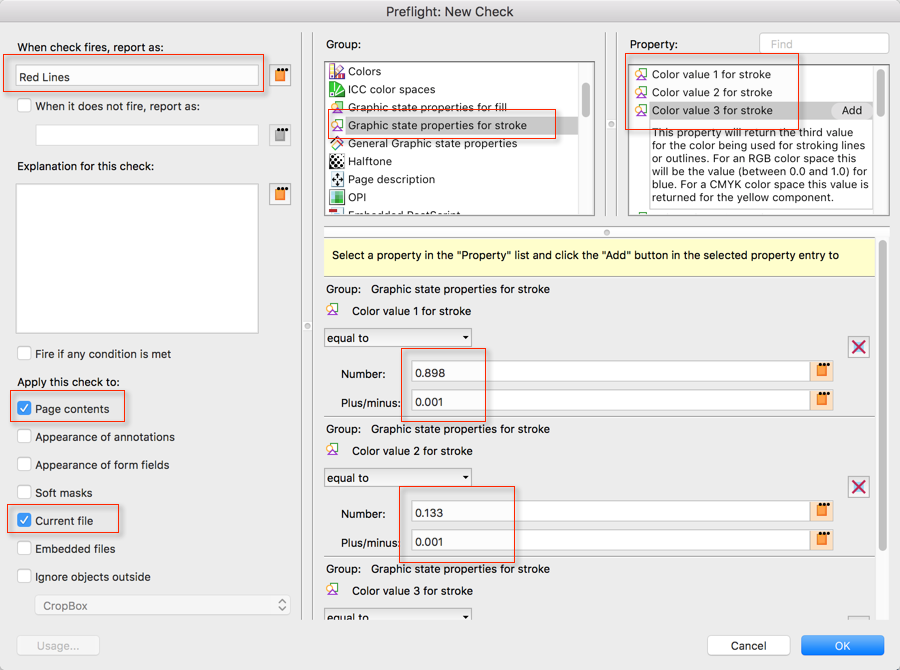
That’s it – we can now automatically remove red lines from our PDF file.
Because Preflight profiles can also be used in Actions (and Custom Commands), we can also run this on more than one file at a time. However, in order to use our Fixup in an Action, we would first need to create a Preflight Profile based on our Fixup. I’ll leave that for another post.
This feature of Preflight is only available in Acrobat DC.


Thank you for your clear post. Does this also work with Adobe Acrobat Pro XI?
Saturn, as far as I know, the “remove objects” fixup is new in Acrobat DC.
Very informative and detail tutorial! I use this: http://www.coreldraw.com/en/pages/pdf-file/ and I find it much easier
I am pretty sure that Corel’s solution will not let you dynamically process files.
Unfortunately Acrobat Pro X doesn’t have this option. It only lets you remove objects outside of the art box, crop box, etc.
Tim, you are right, this is a new feature that was not in Acrobat X and probably also not in Acrobat XI (but I would have to check on that).
Detailed & informative article. But unfortunately couldn’t find the remove object fix-up in acrobat pro xi .
Is there any other way to customize the fix-up as I want to remove all the objects having color as 0.74900
Shubh, as indicated in the comments, this feature is only available in Acrobat DC.
Doesn’t work at all for removing text from multiple pages of a document. At least I can’t find anything in Preflight that addresses text strings.
To remove text, you may be able to use the Readaction function and replace the text with nothing. This will not reflow the surrounding text, but your text will be gone.
Excellent tutorial.
I needed this for removing objects with both stroke and fill properties, i.e. two checks.
Thank you very much!