Page Splitter – For The 3rd Time – Splitting Tri-Fold Brochures

We’ve covered page splitting before, see these two articles for some background information:

Both these posts deal with splitting a page into halfs, this tine we can to look at how to split a page into thirds. To modify the previous script (from the “Redux” post), to handle thirds instead of halfs, we need to make a few changes. In general, instread of creating two copies of every page in the output document, we need to create three copies, and instead of creating two crop boxes (left and right), we need three (left, middle and right).

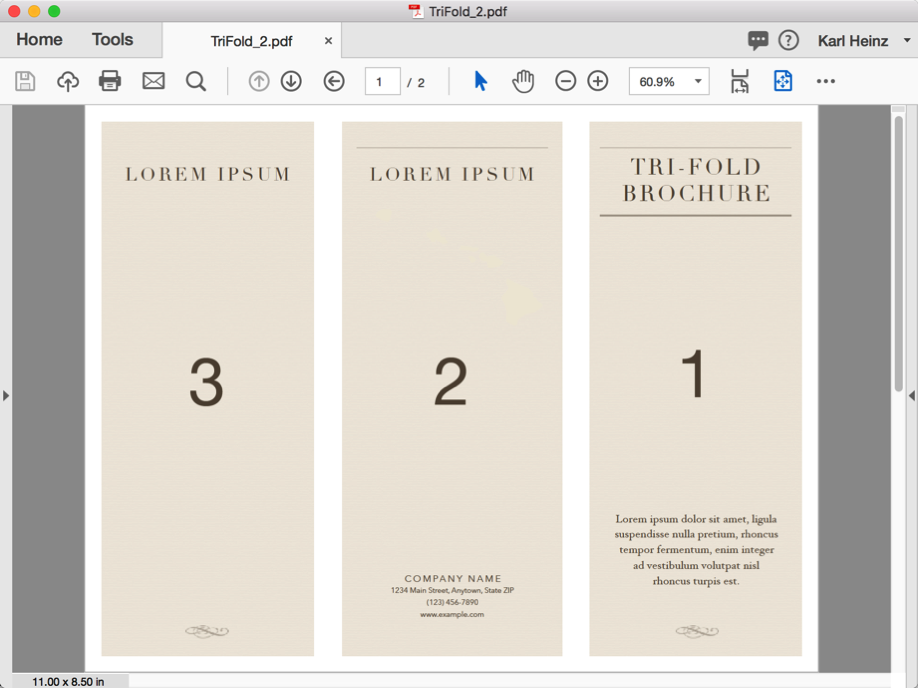
For the splitting into two, we did not consider the actual page order, the same is true here: Chances are you would read such a trifold brochure, in a certain order, we are not taking that order into account, and instead are just extracting the pages from the right (right third first, then middle third, followed by left most third):

Screenshot of a tri-fold document in Adobe Acrobat - pges are numbered 1, 2 and 3 from the right.

Here is the updated script:

/* Split a tri-fold brochure into individual pages */

// create a new document
var newDoc = app.newDoc();

// get the filename of our current file

var i = 0;
while (i < this.numPages) {
	newDoc.insertPages({
		nPage: newDoc.numPages - 1,
		cPath: this.path,
		nStart: i
	});
	newDoc.insertPages({
		nPage: newDoc.numPages - 1,
		cPath: this.path,
		nStart: i
	});
	newDoc.insertPages({
		nPage: newDoc.numPages - 1,
		cPath: this.path,
		nStart: i
	});
	// We did this three times so that we can then split each copy of the page into a left, middle
	// and right potion of the page. 
	i++;
}

if (newDoc.numPages > 1) {
	newDoc.deletePages(0); // this gets rid of the page that was created with the newDoc call.
}

// At this point we have a documnent with every page from the source document
// copied three times.


for (i = 0; i < newDoc.numPages; i++) {
	// determine the crop box of the page
	var cropRect = newDoc.getPageBox("Crop", i);
	var thirdWidth = (cropRect[2] - cropRect[0]) / 3;

	var cropLeft = new Array();
	cropLeft[0] = cropRect[0];
	cropLeft[1] = cropRect[1];
	cropLeft[2] = cropRect[0] + thirdWidth;
	cropLeft[3] = cropRect[3];
	
	var cropMiddle = new Array();
	cropMiddle[0] = cropRect[0] + thirdWidth;
	cropMiddle[1] = cropRect[1];
	cropMiddle[2] = cropRect[2] - thirdWidth;
	cropMiddle[3] = cropRect[3];

	var cropRight = new Array();
	cropRight[0] = cropRect[2] - thirdWidth;
	cropRight[1] = cropRect[1];
	cropRight[2] = cropRect[2];
	cropRight[3] = cropRect[3];

	if (i % 3 == 0) {
		newDoc.setPageBoxes({
			cBox: "Crop",
			nStart: i,
			rBox: cropRight
		});
	} else if (i % 3 == 1) {
	newDoc.setPageBoxes({
		cBox: "Crop",
		nStart: i,
		rBox: cropMiddle
	});
	} else {
		newDoc.setPageBoxes({
			cBox: "Crop",
			nStart: i,
			rBox: cropLeft
		});
	}
}

// save the new document
var re = /(.+)(\.\w+)$/;

var total = this.path.match(re);
var filename = total[1];
var extension = total[2];

var newName = filename + "-split" + extension;

newDoc.saveAs({
	cPath: newName
});
newDoc.closeDoc();

You can use this script by running it in the JavaScript console, in an Action, or in a Custom Command.

Posted in Acrobat, JavaScript, Programming, Tutorial | Tagged , , , , , | 3 Comments

The PDF Time Machine

Have you ever – by accident – modified a PDF file and then hit the save button before you were able to make a copy of the unmodified document? It seems like the only way back is to either restore a backup of the file, or to manually remove all modifications that were applied.

Not so fast… I may be able to offer you a time machine.

Before you do anything, make a copy of your PDF file and keep that in a safe place, then make a second copy which you will work with. Do not try to make this copy by selecting File>Save As, this may destroy any chance of going back to older versions of the document, instead, use the file manager your operating system provides (Windows Explorer or Finder) to create a copy of the file.

Now comes the crucial question that will determine if we can actually go back in time:

Did you use File>Save to save your document or File>Save As and selected the original filename (and therefore overwriting the original file)? There is a big difference between the two save mechanisms, and if you’ve only used “Save”, you may be able to recover your document.

Let’s take a look at the differences between these two ways of saving a PDF file:

File>Save will create “incremental updates”, which means that Acrobat will leave the original file as is, and will only append new or modified information to the end of the original file. There is some control information in that incremental update that allows a PDF processor to walk through all incremental updates in reverse order, and then finally arrive at the original file. This means that such a PDF file contains a record of every change since the last time a full save operation was performed. When you have a lot of incremental updates in a file, opening this file will be slower than opening a file without any incremental updates.  Acrobat used to warn the user about that and suggest to combine all these incremental updates, and flatten them. I have not seen this warning in a long time, so I assume that Acrobat is no longer using this warning.

When File>Save As is used, then the PDF file is re-written from scratch, and all incremental updates are being combined with the original PDF file. Once this is done, there is no record anymore of all the changes that have been applied to this file since the last time it was rewritten, or originally created.

We can use this knowledge to our advantage and go back in time to a previous version of the PDF file.

The following steps are very technical, and you may opt not to do this. If you do, and things go wrong, you have your backup copy and the original file, so you can start over.

You need a binary editor – this is a text editor that can modify files that contain binary data. You can for example use Notepad++ on Windows or TextMate or BBEdit on a Mac. There are other options, the key here is that the editor must not modify any data in the file on its own (e.g. replace a line ending character with what is customary on the current operating system). What I do to test if a certain application will work is to open a PDF file, and then using File>Save As to create a new version of that file. If both are identical (and both open without any errors or complains in Adobe Acrobat), the tool will work. Microsoft Word or any other word processor will not work.

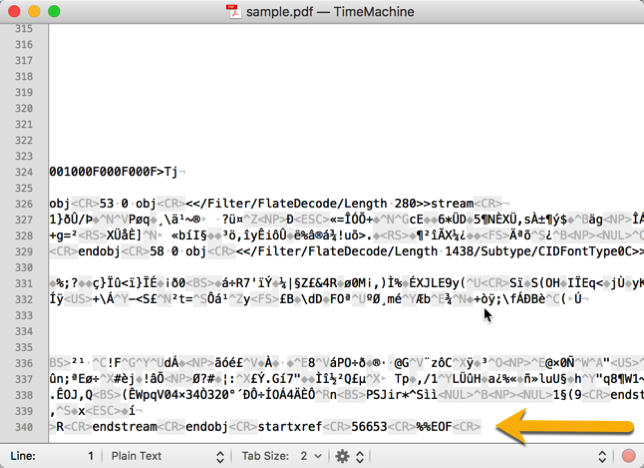
Open the file and go to the end of the document. Make sure that you do not accidentally modify anything in the document.

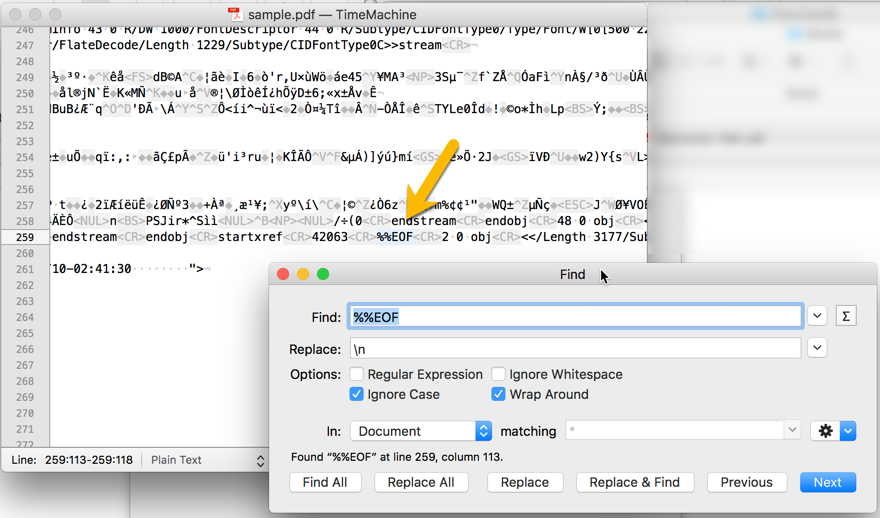
Screenshot of the end of a PDF file loaded in a text editor

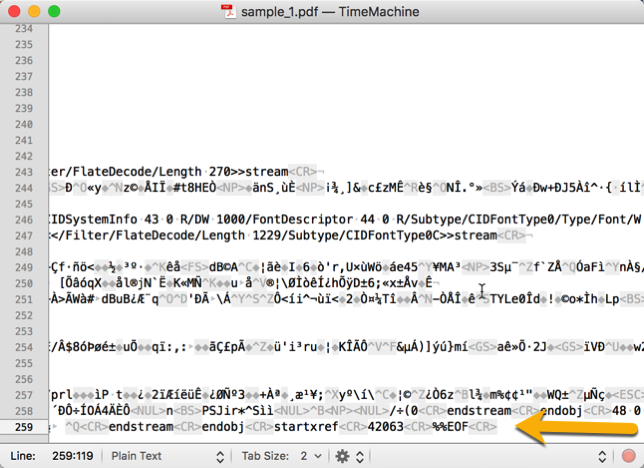
The “%%EOF” may actually not be on a line on its own – depending on what text editor you use, and how it interprets end of line characters, and how the PDF file was generated. In the sample, the last line is surrounded by “” symbols, which represent a carriage return character. The key is to find the last occurrence of “%%EOF”, and we see that in that last line.

Once you are at the end of the document, search backwards for the string “%%EOF” (which should also be the contents of the last line in your document).

2017 10 19 14 56 03

After you find the previous “%%EOF” sequence going backwards in your document, delete everything that is after that line all the way to the end of the document. Keep in mind that you may have to leave the end of line character(s) that are using in your particular PDF file after that instance of “%%EOF”.

2017 10 19 14 57 37

Save the document (preferably under a new name – e.g. fixed.pdf). Now try to open that just created document. It should contain anything that was in your document before you last saved it.

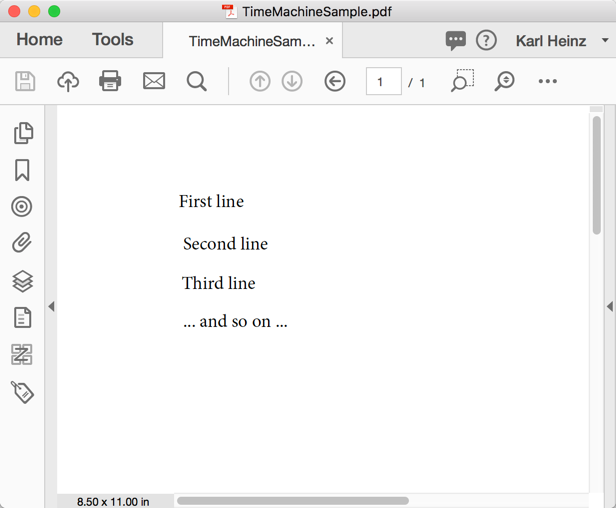
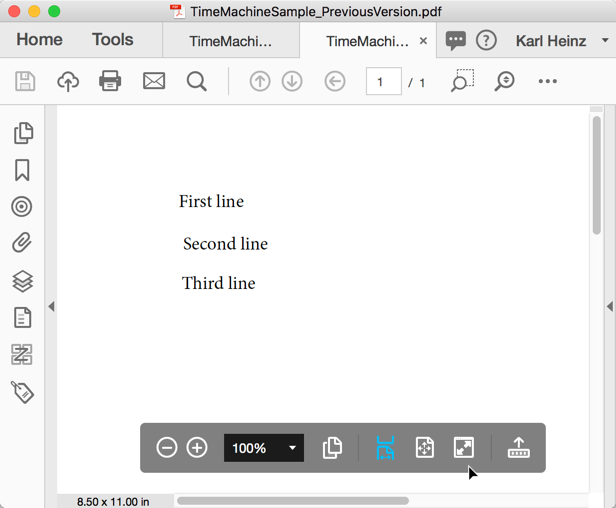
When we apply this multiple times, until we reach the last “%%EOF” in the file, we can create all versions of the PDF file that were saved by selecting File>Save. This sample PDF document contains four lines that were added in between save operations, so when we go back one incremental update at a time, we can create the file with three, two, one and zero lines of text.

Original version:

2017 10 20 09 05 52

Recovered version, one level back:

2017 10 20 09 06 25

You will need to be very careful about not accidentally changing more in the file than removing the portion after the previous “%%EOF”.

Again, this will only work if the file was saved with incremental updates (File>Save). When you do a “File>Save As”, then the file is generated from scratch, and all incremental updates will be flattened.

If this is not something you feel comfortable doing, and you are willing to make use of my professional services, please feel free to get in touch with me. My contact information is on the “About” page.

Posted in Acrobat, PDF, Tutorial | Tagged , , | 5 Comments

Connect to Database from PDF Form – This Time Without SOAP

I wrote about how to get data from (or to) a database from a PDF form using SOAP a while ago. Using SOAP poses a problem when you want to make such a solution work with the free Adobe Reader. In the past, Adobe had an ODBC interface built into the Windows version of Acrobat/Reader (named the ADBC interface), but that had the same problem as far as Reader goes, and was removed back in the days of Acrobat 9. So what can be done to connect a PDF form to a database in a way that also works with the free Reader? Be prepared for a long post that is of the most part about PHP running on a web server. You will need a web server that supports PHP if you want to follow along. I assume you know how to install PHP scripts on your web server, and also how to create PDF forms that submit data to a server.

The solution is to “talk” back and forth between the PDF form and the web server using XFDF. XFDF is the XML version of FDF, the “Form Data Format”, which is based on the PDF format (it’s a stripped down version of PDF). The FDF format can be used to submit form data from a PDF form to a web server, and to receive information back from the server. Reading and writing FDF is a complex task, and Adobe used to have the FDF Toolkit, which helped with these tasks, but this toolkit has not been updated since Acrobat 7 and is not supported by Adobe anymore. The XFDF format can do almost anything that can be done with FDF, but in a much easier to parse and to write format.

To take a look at what FDF and XFDF files look like, it’s easy to create them by exporting data from a PDF form using Adobe Acrobat: In Acrobat DC, load a form and then search for “export” in the tools search bar and select “Export data from a form file” in the “Prepare Form” cateogry. You can then select the output format on the “Save” dialog (use either FDF or XFDF). Here is a sample FDF file (slightly reformatted to make it easier to read):

The corresponding XFDF file looks like this (again, slightly reformatted for human consumption):

For anybody with at least some XML background, it’s obvious that the XFDF file is much easier to understand and to parse. The FDF format is described here: http://www.adobe.com/content/dam/Adobe/en/devnet/acrobat/pdfs/fdf_data_exchange.pdf, and the XFDF format is described in this document: https://www.yumpu.com/en/document/view/32927291/xml-forms-data-format-xfdf-specification-adobe-partners (I don’t have a link to the original Adobe hosted document, I also don’t know how reliable or trustworthy this service is).

Let’s take a look at what the XFDF document above contains: There is one top level XML node (as required by the XML standard) called “xfdf”, which contains three nodes: f, fields and ids – for now we can ignore the f node (which is just a reference to the PDF file this XFDF data came from – should be imported into), and the ids node (that’s the document ID). The interesting “stuff” is happening in “fields”: It contains a list of field nodes – each one describing the data stored in a specific field. Each field node has a “name” attribute, and contains a value node with the actual data. In the example above, we can see that there is one field in the document named “Field 1”, which contains the string “test data”. Pretty simple.

As mentioned before, this file was exported from a form, so we can see what data was actually entered in the form, but the same approach can also be used to import data into the form. I can for example change the value node to now contain the string “new data”. When I now use the import function in Acrobat, I can fill my form with this updated data.

What we’ve done so far by manually importing and exporting can be automated. To export data we can for example use the “submit a form” action on a button – or the Doc.submitForm() JavaScript method. Both methods allow us to specify the format we want to submit our data in. We are looking at XFDF, so let’s select XFDF as the form’s submission format.

Data is usually submitted to a web server (it can also be emailed, but for automation purposes, that just complicates things). Before we can actually submit the data from a form, we need to take a look at how we can receive that data on the server. The following example will use PHP on an Apache server, but you should be able to adapt the solution to any other server setup.

The most simplistic PHP script that can accept data but without actually processing the data (it’s only stored on a variable that we never use again) is this:

When we now submit our form data to this PHP script on a web server (I assume you know how to setup PHP scripts on your server), and we click on the submit button in Adobe Acrobat, we get a new PDF file that reads “Received some data.”. This looks like our data made it to the server – but we don’t yet have a way to get information back.

When we make things a little bit more complex, we can actually see the submitted XFDF:

What are we doing here? The data that is sent back (which is just text) gets interpreted by Acrobat as HTML, this means that it will filter out all the XML. In the additional line of PHP code we just added, the “<" gets replaced with it's entity string, and that will make all the XML visible. After submitting the form data again, we see the following in Acrobat: Screenshot of PDF document in Adobe Acrobat that shows XML code.

We actually see two form fields in this XFDF data structure: The submission button is reflected as well.

Our problem now is that Acrobat is creating a new PDF file with the contents of the data we are sending back. Before we find a way to avoid that, let’s take a look at how Reader handles this scenario:

Acrobat can convert from HTML (or text) to PDF, and that is what is happening here: Acrobat receives a message back from the web server and it converts that to PDF and opens that new PDF as a new document. The free Adobe Reader cannot convert from HTML or text to PDF, so when you try this in Reader, you will end up with an error message.

How can we get data back into our form? The key here is that Acrobat will expect an FDF or XFDF data structure that is returned after a form submission if we append “#FDF” or “#XFDF” to the URL. So, if we so far just used “http://localhost/XFDFTesting/submit.php”, we need to adjust that URL to read “http://localhost/XFDFTesting/submit.php#XFDF”

The good news here is that once we force the server’s reply back into the same document using this mechanism, Reader will be happy too, and that means we can create a connection between a PDF form opened in Reader and a database (as long we we provide this PHP “glue” in between the two), and that without having to apply special rights to the PDF document. This is not something that was possible with the old ADBC mechanism, nor is it possible when using the current SOAP implementation.

But, to do that, we need to reply with valid XFDF data. Let’s try this with a hardcoded response:

Besides the hardcoded string, we are also setting the content type of the reply to “application/vnd.adobe.xfdf”, which tells either the browser, or Acrobat (or the free Adobe Reader) that the reply contains XFDF data.

When we now submit our form, the server will reply with an updated value for “Field 1”, and Acrobat in turn will update that field’s value.

Security

If you followed along so far, you’ve probably noticed that Acrobat will not just allow you to submit data to a web site, it will prompt the user to select if the operation should be allowed once, or forever, and will then force the user to actually click on the submission button again to actually send the data to the server. When you create a solution based on this technology, please inform your users about what to expect when clicking the submission button for the first time, and how to proceed.

Reading and Setting Data

At this point, we have almost all the parts that we need to create a solution that reads and processes information submitted by the form, and to reply with a data record that Acrobat (or Reader) can use to populate fields in a form. To make things comparable to the SOAP implementation I presented earlier, I will again create and retrieve a unique number from a database so that e.g. a form can be labeled with that unique number. You may want to “>visit my earlier post for some background information.

What is still missing is only plain PHP – nothing specific to Acrobat or the PDF environment: We need to parse the XFDF data we receive from Acrobat (remember, this is just XML, so anything that can parse XML will do), and we need to create a response in valid XFDF with potentially updated information.

Here is a PHP script that adds these two missing features:

This is quite a bit more complex than the simple sample scripts we’ve used so far. There are two key sections in this PHP script:

When the original form submission is processed, we need to parse the XFDF data and extract the information we need to create a unique number. This is done by creating a new DOMDocument ($myXFDF) and initializing that with the submitted form data. Then, we use XPath constructs to retrieve the actual data. You can read up on how to use the DOMDocument object here: http://php.net/manual/en/class.domdocument.php

Once we have the updated data, it needs to be wrapped in XFDF again, and this is done in the function createXFDF() – we pass an array that maps field names to the fields’ values into this function. There are two optional arguments to this function, which we will ignore for now. There will be a future post about how to use the $file parameter.

I am not making any files available for this little project – they would depend on the actual implementation of your solution (e.g. where on your server the scripts are stored) – but it should be fairly straight forward for anybody with PHP experience to create such a solution and deploy it. If you need help with your implementation, I do provide this service as part of my consulting business, so feel free to get in touch with me via email.

Posted in Acrobat, PDF, PHP, Tutorial, Web Server | Tagged , , , , , | 8 Comments

Remove Content from PDF Files Using Acrobat’s Preflight

Have you ever tried to selectively remove content from a PDF file? There are a number of ways you can approach that:

  • Use “Tools>Edit PDF>Edit” and select the content in question, then press the Delete key
  • Use the “Contents” navigation pane (View>Show/Hide>Navigation Panes>Content), then find the content element in the tree and hit the Delete key
  • Use “Tools>Print Production>Edit Object”, select the object and hit the Delete key

There are probably more methods than these three that involve pointing and clicking, but regardless of which one you pick, it will be a lot of work to do this with many similar items. And, sometimes it seems to be impossible to select the one item you are interested in.

Acrobat’s Preflight function is a very powerful tool with many different use cases: You can check files for conformance with certain PDF standards, you can identify problems in PDF files, you can fix certain problems in PDF documents, and more. Just recently I wrote about a way to use Preflight to scale page content. Let me add a quick warning here: Preflight is only available in Adobe Acrobat Pro, it’s not part of Acrobat Standard.

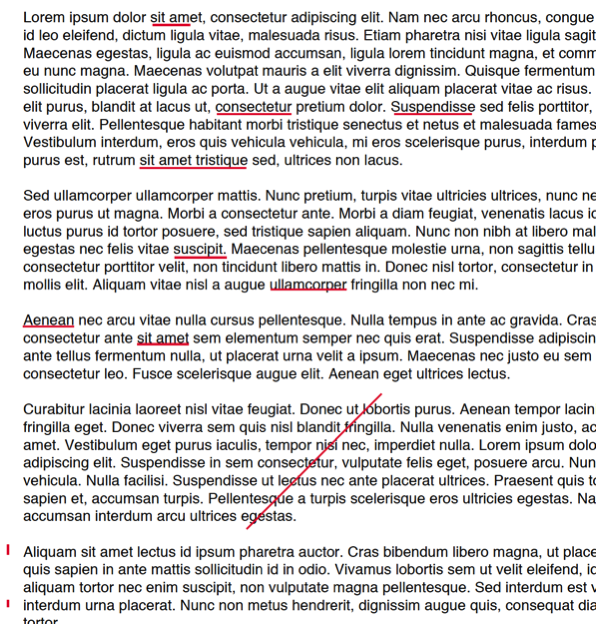
Preflight can also help us with removing unwanted content. Let’s say we have a document that somebody marked up with red lines, and then flattened the document so that the markups are no longer comments that can be removed, but static PDF content:

Screenshot showing a PDF document that has red markup in different locations

How do we remove all red lines in e.g. a 100 page document without having to click on every single one of these line segments?

Preflight to the Rescue!

Before we can create a Preflight “FixUp” to remove these lines, we need to figure out how we can “describe” them to Preflight so that it does “know” which ones to remove, and what to leave behind. In this example, I will assume that all we need is to know that it’s a line, and that the color is a certain shade of gray. If that is not sufficient (e.g. because you have lines with different line width values, and some of them should be removed, and others should remain in the document), you will have to adjust the rules to identify the objects that should be removed.

The first thing we need to know is that what we want to do is hidden in the “Fixup” category in Preflight. When you bring up the Preflight tool, there are three different categories to choose from:

  • Profiles
  • Checks
  • Fixups

Profiles are complex things that can do many different things at the same time, Checks are tests for a certain condition (we will create a Check further down to identify our red lines), and Fixups are changes to a PDF document, whereas each Fixup contains one specific modification.

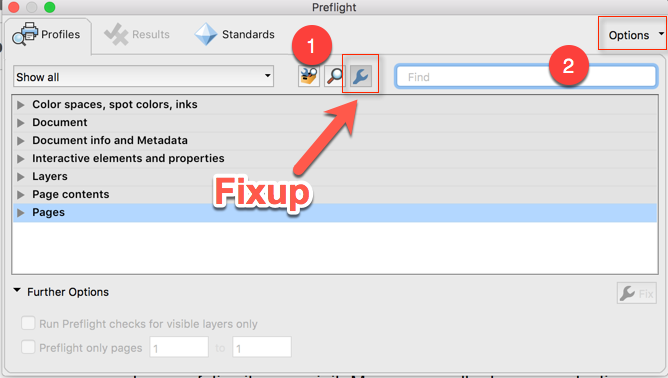
To create our new Fixup, we need to select the “Fixup” category, and then click on the “Options” menu:

Screenshot of the Adobe Acrobat Preflight tool

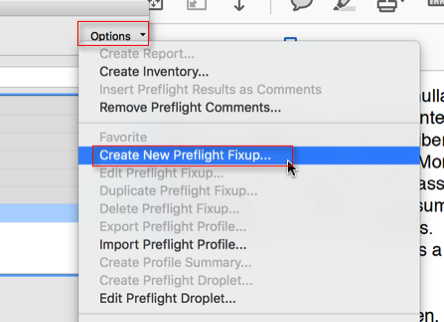
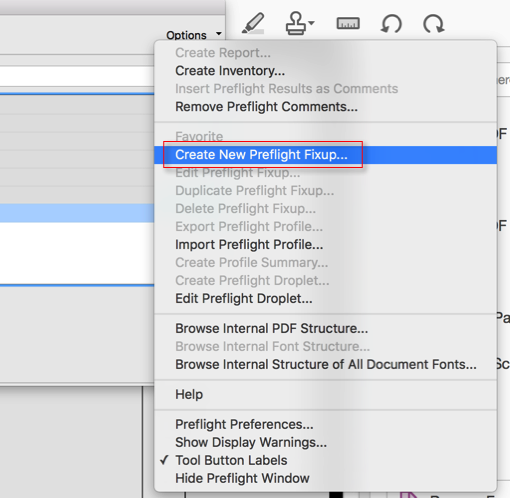
From the “Options” menu, we select to “Create New Preflight Fixup”:

Screenshot showing the expanded 'Options' menu with the 'Create New Preflight Fixup' item selected

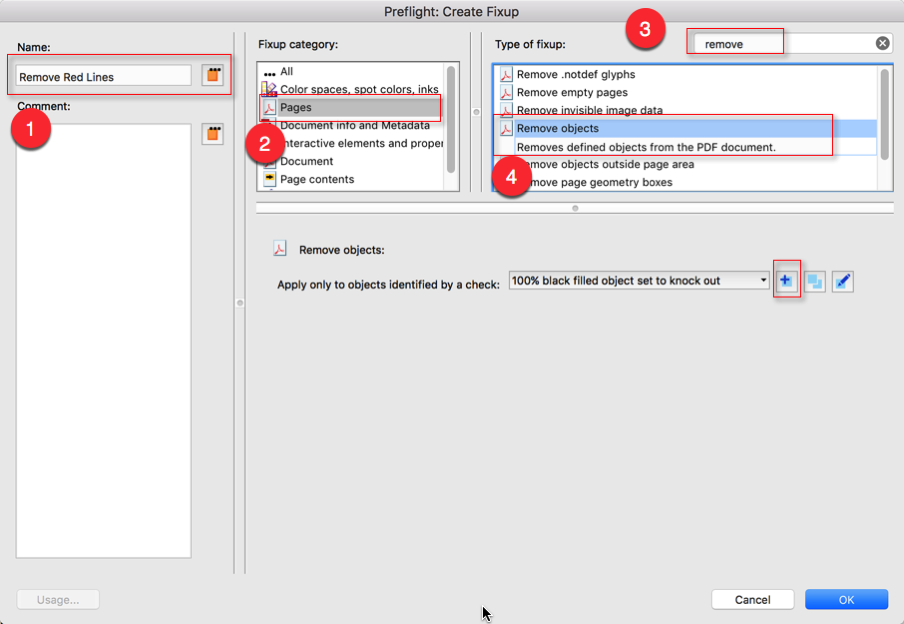
This will open a new editor window. The first thing we need to do is to specify a meaningful name for our new Fixup (e.g. “Remove Red Lines”). The second step requires us to know that removing objects is in the “Pages” category, so we select “Pages”, and then the “Remove Objects” type of fixup:

Screenshot of the Preflight dialog, with the category 'Pages' and the item 'Remove Objects' selected

To speed things up a bit, we can search for the term “remove” in the “Type of fixup” table, so that we don’t have to scroll through the whole list. For now, we leave the lower portion of this dialog alone. We will change the type of object to remove in the next step.

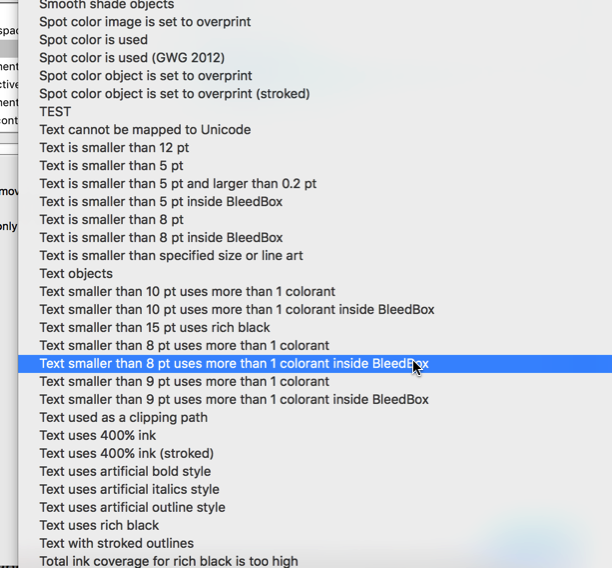
When you browse through the list that is associated with the “Apply only to objects identified by a check” selection, you will find a huge number of different checks, but none that would select just red lines:

Screenshot of a part of the dropdown options available as 'Checks'

This means that we need to build our own “Check”, and we do this by clicking on the button that adds a new check – that is step #5 in the screenshot above.

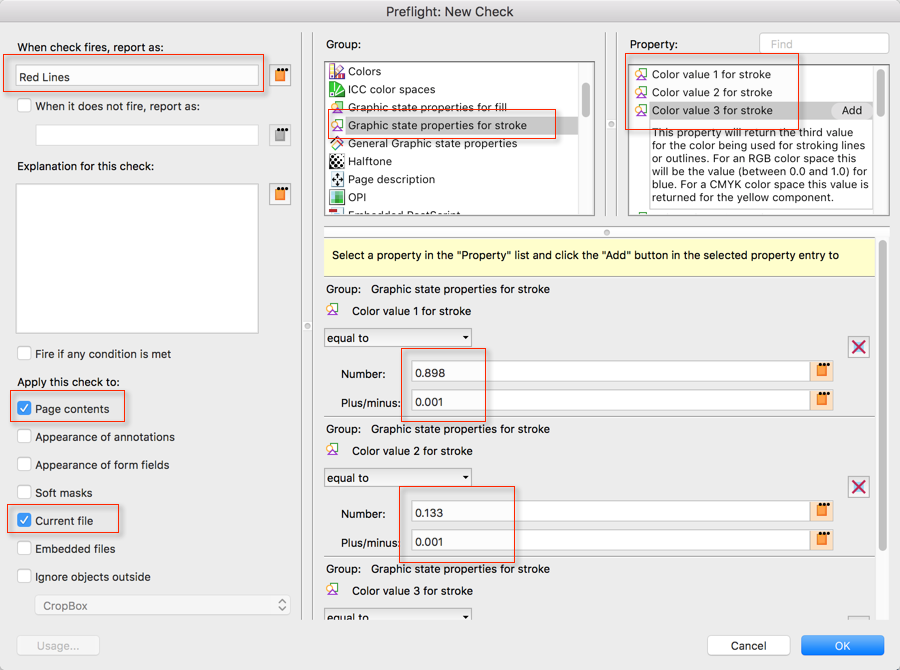
The next dialog follows the same pattern as the previous one: We select a meaningful name for this check, and then try to describe our red lines:

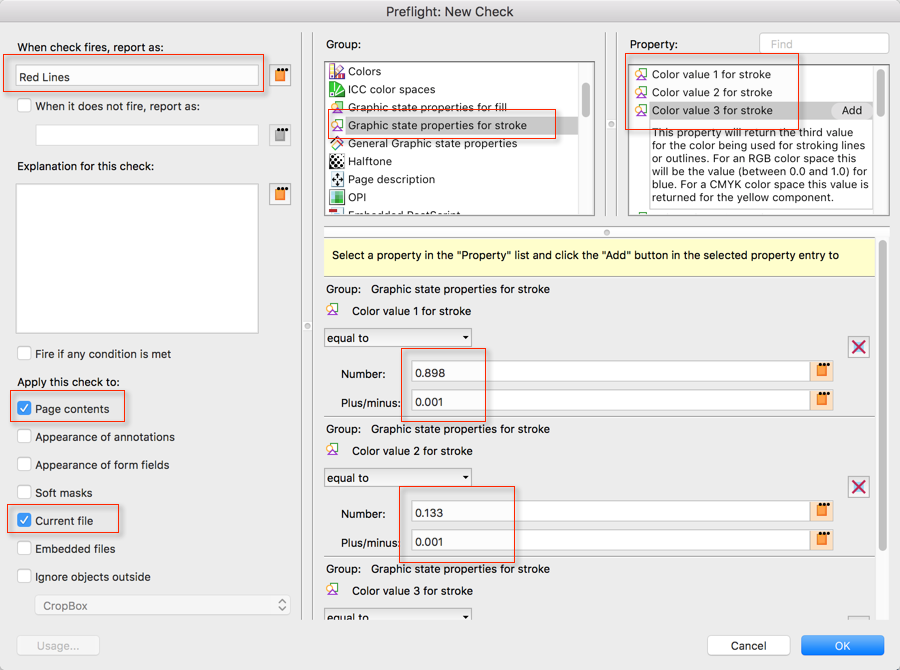
Screenshot of the dialog that allows the user to add a new Preflight Check

We need to add the following rules (the list contains elements in the format “Group > Item”):

  • Page Description > Is Line
  • Graphic State Properties for Stroke > Color Value 1 for Stroke
  • Graphic State Properties for Stroke > Color Value 2 for Stroke
  • Graphic State Properties for Stroke > Color Value 3 for Stroke

Sounds pretty straight forward, but the problem now is to determine the correct components for the color values. I cheated a bit in the list above: I already assumed that we were dealing with a color that uses three components. This is only true for RGB colors. Colors represented as CMYK values use four components, and grayscale ‘colors’ require just one component.

So, how do we find out what these components are? Let’s save our Fixup for now, and pick it up later.

Object Inspector

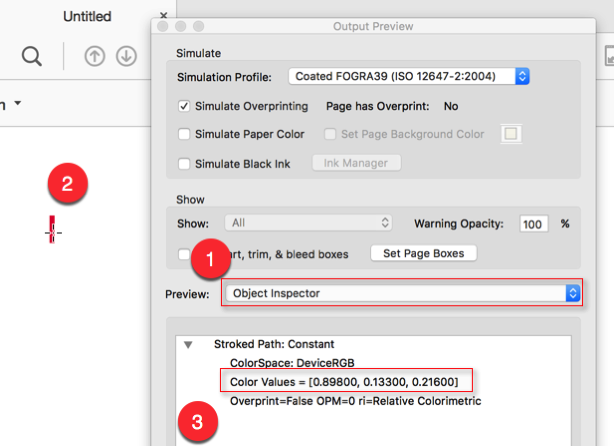
In order to find out more about these red lines, we need to “inspect” the properties of one of the instances. The tool for this is the “Object Inspector”, which is part of the “Output Preview” tool (Tools > Print Production > Output Preview):

Screenshot of the 'Output Preview' tool, with the 'Object Inspector' preview type selected. The lower portion of the dialog shows the description of the selected red line segment.

The “Object Inspector” is one of the well hidden secrets in Acrobat, and to expose it, we need to set the “Preview” type to “Object Inspector”, then we can select an item in the PDF file (e.g. our red line), and then see the properties of the item. In this case, we are interested in the color values, which the tool reports as a triplet of values (hence the three values we added to our Preflight Check):

  • First value, or R(ed) = 0.89800
  • Second value, or G(seen) = 0.13300
  • Third value, or B(lue) = 0.21600

These are our RGB values we need to get into the Preflight Check. When we take a closer look at these numbers, we see that we are dealing with three significant decimals, sometimes you see more, but I usually limit myself to rounding to and using just three decimals.

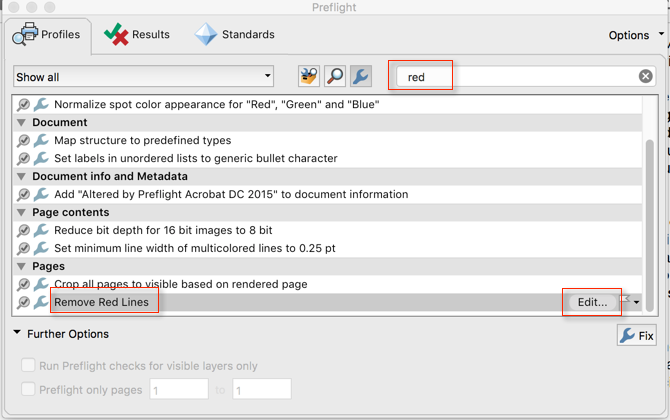
Let’s continue with our Preflight Fixup. To find the one we left unfinished, we can search for part of the name that we’ve used (e.g. search for “Red”). Once located, we select to edit it:

Screenshot that shows the 'Edit' button for the selected Fixup

On the Fixup dialog, we then select to edit the Check we’ve been working on:

Screenshot that shows the Check edit button.

And now, we can fill in the missing information. The three color values are specified as a number, and a small plus/minus difference, so that numbers close to what we specific will still be treated the same way. Because of rounding problems, I use three significant decimals, and then specify a +/- 0.001:

Screenshot that shows the Preflight Check editor with the color values inserted.

That’s it – we can now automatically remove red lines from our PDF file.

Because Preflight profiles can also be used in Actions (and Custom Commands), we can also run this on more than one file at a time. However, in order to use our Fixup in an Action, we would first need to create a Preflight Profile based on our Fixup. I’ll leave that for another post.

This feature of Preflight is only available in Acrobat DC.

Posted in Acrobat, PDF, Tutorial | Tagged , , , , , | 11 Comments

Scaling Page Content in Adobe Acrobat Pro DC

Before Adobe Acrobat Pro DC, it was not possible to scale pages from e.g. 5×7″ to Letter size, or form A4 to A5 by changing both the page size, and scaling the page content to fit the new page size. All previous versions of Acrobat had to offer was the crop tool, and it’s “Change Page Size” option to either crop out a portion of the page, or to make the page size larger, but in both cases, the size of the page content was not changed.

In Acrobat Pro DC, Adobe introduced a new scaling feature in the Preflight tool. Because Preflight is a Pro-only feature, this is not available in Acrobat Standard.

Acrobat comes with a number of sample profiles that demonstrate the tool, but none of them is very useful (unless all you want to do is scale to A4 sized paged, or always use a certain scaling factor). I will show how a new fixup can be created that actually prompts for the dimensions of the new target page size. In my example, I will scale to a target size of 6×9″, but that can be any size, and you can use other units besides inches as well.

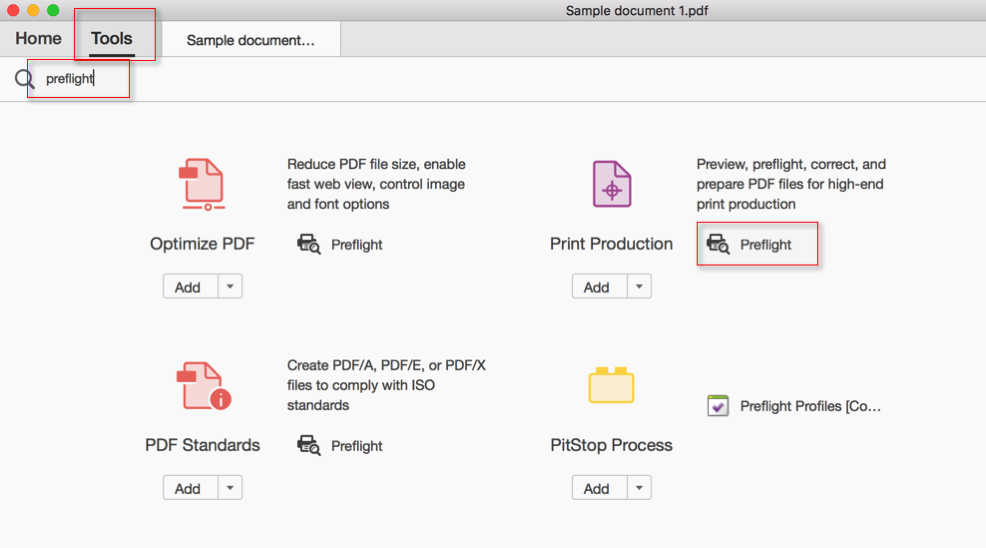
This is a Preflight option, so we need to open up the Preflight tool first (e.g. search for “Preflight” in the “Tools” area):

2017 03 25 17 44 25

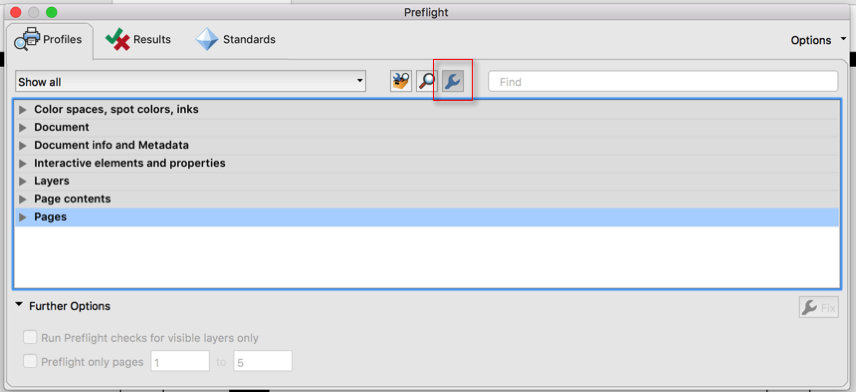
Once the Preflight dialog is up, select the “Single Fixups” category (the wrench icon in the screenshot):

2017 03 25 17 11 51

Now use the “Options” menu and select to create a new fixup:

2017 03 25 17 12 13

This will bring up a potentially confusing looking interface – at least if you’ve never been in here before – but when you follow my instructions, it should be pretty straight forward:

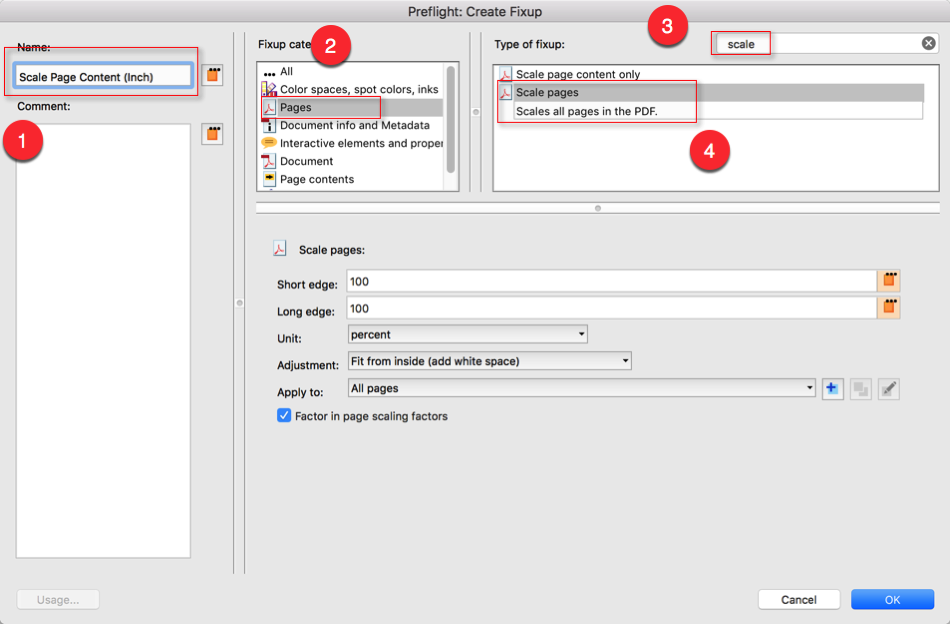
2017 03 25 17 14 44

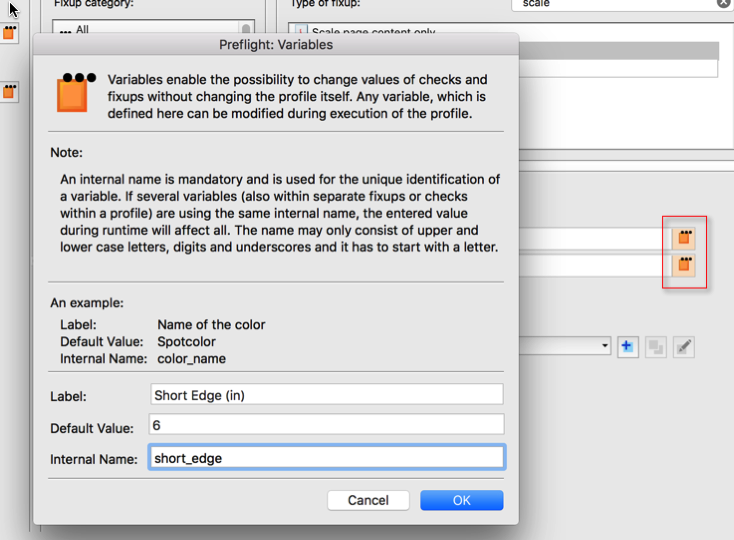
Use a descriptive name for this new fixup, then select the “Pages” category and search for fixups that have “scale” in their name and select the one named “Scale pages”. Now we need to fill in some data in the lower part of the dialog. You see the two orange buttons next to the short and long edge fields? Click them – one after the other – and fill in some values:

2017 03 25 17 16 38

For short edge use these values:

Label: Short Edge (in)
Default Value: 6

Internal Name: short_edge

And, for long edge use this:

Label: Long Edge (in)
Default Value: 9
Internal Name: long_edge

If you are using a unit system different from inches, your default may be different.

Now back on the main dialog, we need to adjust a few more things:

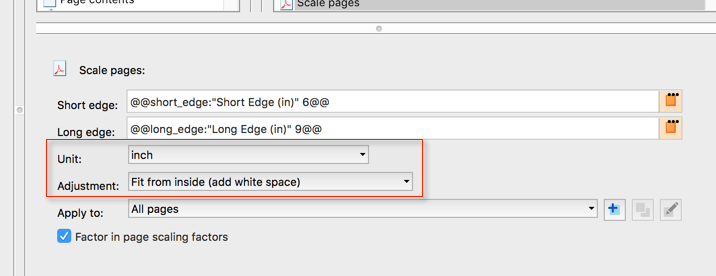
2017 03 25 17 19 41

Set the units to “inch” – or to whatever your preferred units are. The “Fit from inside (add white space)” option specifies that the original page should be scaled so that it fits within the new target rectangle, and that the remaining space, not covered by the original page should be filled with white.

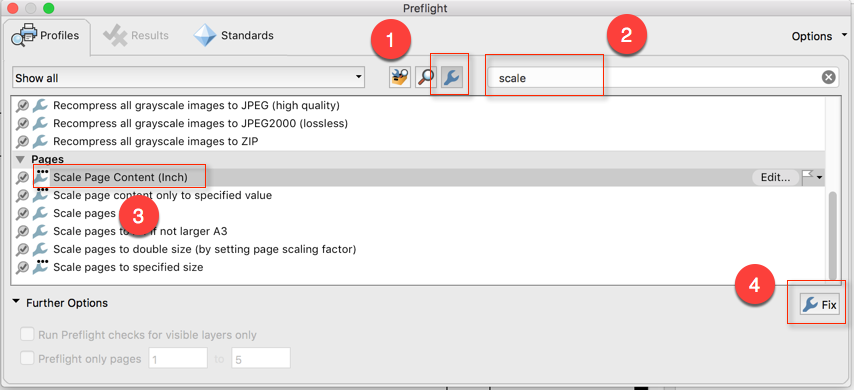
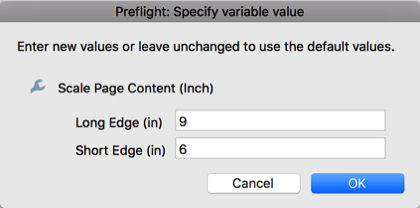
Now you can select the fixup and apply it to your open document. It will prompt you to select a target page size in inches (you can just accept the defaults in your case), and it will scale all pages in your document.

2017 03 25 17 34 54

2017 03 25 17 36 20

Update:

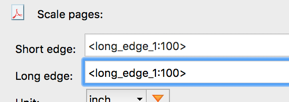
In a recent update to Acrobat DC, Adobe changed the way variables get added to the user interface. When you just click assigning a variable to either the short or the long edge, Acrobat will not remove the number that is already on the line, and will just insert the new variable at the beginning of the line:

You need to remove the number at the end of the line, so that only the variable (from “<" to ">“) remains on the line:

Posted in Acrobat, PDF, Tutorial | Tagged , , , , | 64 Comments

Clear Image Field in PDF Form With Acrobat’s JavaScript

You’ve probably heard by now that the latest release of the Adobe Acrobat DC subscription version comes with a couple of new form field types (see here for more information). Image fields are not new, but they are now much easier to create. When the user clicks on a field, Acrobat will then prompt to select an image file, and the image field will get filled with the contents of that file. That is pretty straight forward.

Unfortunately, resetting a form will not remove that image, but will clear out all other information added to a form. How can we add functionality to the form that also clears out the image field(s)?

Before we dive into that, we need to take a look how we can programmatically set the button icon. The Acrobat JavaScript API gives us two different methods:

There does not seem to be any method to reset or delete a button icon. This means we have to think a bit outside of the box to come up with a solution. There is a method to retrieve a button icon (Field.buttonGetIcon()), this means we can setup a button with a blank image, and then get that blank image and assign it to the image field/button that we want to reset. This works, and the good news is that we don’t even have to setup the button with a blank image, that is what it will return by default.

The process to set this up in a form is as follows:

Create a Hidden and Read-Only Button

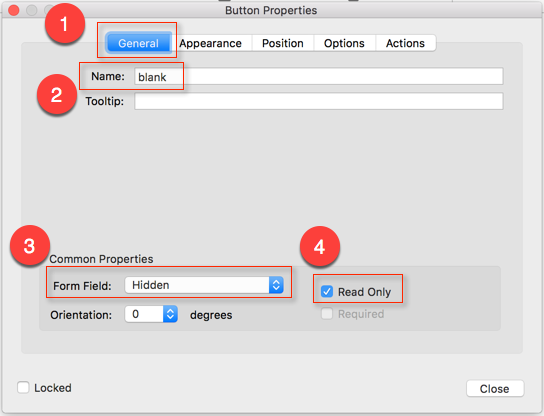
The “blank” button we want to use to retrieve the blank image from should not appear on the user interface, and a user should also not be able to interact with such a button. This means we need to make it read-only and hidden. To do that, open up the button’s properties dialog and go to the “General” tab.

Use a meaningful name for this button – I’ve used “blank” in the example above – and set the field to “Hidden” and “Read Only”.

Create a “Reset” Button

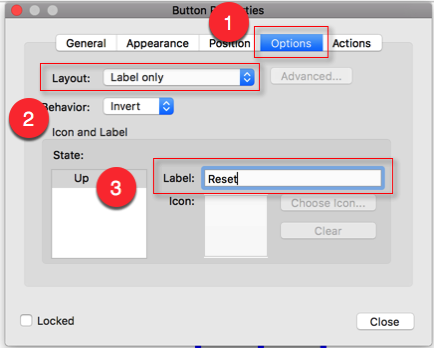
To reset the form and the image button, we need to add a “Reset” button to our form. Add a button and set its label to “Reset”:

In the next step we will develop the JavaScript code that we want to execute when this button is clicked.

JavaScript Code to Reset an Image Field

We can now retrieve the button’s icon using the following line of JavaScript code:

We can combine this with the command to assign this new icon to an existing field. Let’s assume we have a field named “ImageField” in the form. To set its button icon, we need to perform the following command:

And, because we are using the icon from the blank button, we are essentially erasing the existing image.

In addition, we also want to reset the rest of the form, so that gives us this as the final script:

Screenshot showing the \

We can now – on demand – reset the form and the image button in our form.

Here is a PDF page that shows this functionality: resetImageButton.pdf

Posted in Acrobat, JavaScript, Programming, Tutorial | Tagged , , , | 6 Comments

What Are You Interested In? Last Year’s Top Ten Pages

I am always interested in what article on my blog are the ones that remain popular over time. Here is last year’s top ten list:

# Page Name / Link Page Views (Percent)
1 Duplicate a Page in Adobe Acrobat 14.37%
2 “No Pages Selected To Print” Error 10.14%
3 Where are my Adobe Acrobat 9 Updates??? 8.70%
4 Home Page 7.71%
5 Modify Dynamic PDF Stamps in Acrobat 7.14%
6 Validating Field Contents 6.31%
7 Batch-Import Excel Data into PDF Forms 3.97%
8 Missing Characters After Merging or Inserting PDF Files? Here is a Potential Workaround 2.75%
9 Create Custom Commands in Adobe Acrobat Pro DC 2.70%
10 Acrobat DC is Here – You may want to wait with upgrading until you read this… 2.42%

Let’s take a look at the different pages and my take on the issues:

#1: Duplicate a Page in Adobe Acrobat

This is a surprise winner: I would not have thought that duplicating a page in Acrobat is such an important feature. For those who’ve read the page – or know how to do this already – it’s not very intuitive, so that may explain why people are searching for (and finding) this page.

#2: “No Pages Selected To Print” Error

No surprise here, based on my work on the (now defunct) AcrobatUsers.com and the Adobe Forums, I know that this problem has been a around for a few years without a fix or a good explanation about why it’s happening in form of a KB article from Adobe.

#3: Where are my Adobe Acrobat 9 Updates???

Adobe has fixed part of the problem by now providing a PDF file that explains what updates need to be applied in what order, but users are still struggling with finding the updates. The FTP server is just not as intuitive as clicking on a web link.

#4: Home Page

Almost 8% of visitors come in through the home page (or end up on the home page eventually). This is interesting – and good – for me because that’s where I advertise my services. I have to pay my mortgage and eat so that I can create all this free content. If you have any needs in the big world of PDF, please consider my consulting business as a shortcut to a working solution. And to those of you who have hired me: Thank you!

#5: Modify Dynamic PDF Stamps in Acrobat

This is an old one, but still valid and useful. Oftentimes it’s easier to just modify one of Acrobat’s own dynamic stamps to create something new, compared to starting from scratch. Stamps are a big part of my business, so there is no surprise that this has been a top 10 contender for a number of years.

#6: Validating Field Contents

A good form needs form field validation, and oftentimes that can only be done using JavaScript. One of these days I will write about using regular expressions in these validation scripts, which oftentimes makes things a lot easier.

#7: Batch-Import Excel Data into PDF Forms

This again is a big part of my business, and I know that a lot of people get “their feet wet” with the simple examples that I posted and then turn to me for help for more complex solutions. There is a lot more that can be done with importing (or exporting) form data than what I am able to describe in these simple examples.

#8: Missing Characters After Merging or Inserting PDF Files? Here is a Potential Workaround

I’ve spent a lot of time in debugging different missing character problems in Acrobat, and this is still the most straight forward way of fixing some of these issues. It does not work for all problems, but it’s a good first step in the debugging process.

#9: Create Custom Commands in Adobe Acrobat Pro DC

This is almost two years old, but custom commands are still one of my favorite new addition to Adobe Acrobat DC. Oftentimes It’s like Actions, but for one document, without the overhead of an Action, and they can be added to the toolbar. If you want to automate things in Acrobat, this is a good staring point.

#10: Acrobat DC is Here – You may want to wait with upgrading until you read this…

This is no longer an issue, and hopefully it will make room for other top 10 candidates next year.

Posted in Blogging, Misc | 2 Comments

Rotate PDF Fields in Adobe Acrobat Using JavaScript

Have you tried to rotate a field in a PDF form after it was created in Acrobat? If so, you may have scratched your head a bit.

Before we get to the how, let’s first talk about the why: When you have two different documents, one having a page rotation of 0 degrees, and the second one with a page rotation of 90 degrees (or, two different pages in the same document with different page rotations), and you copy a form field from one page to a page with a different page rotation, the form field will be rotated, and you will have to rotate it back in order to get the correct alignment and orientation. When you now try to rotate this field by setting its rotation property, you will very likely end up with something that looks nothing like what you expected (that is, if you’ve selected a rotation of 90 or 270 degrees, with 180 degrees things will look OK without having to do anything else).

Here is what happens when you do that:

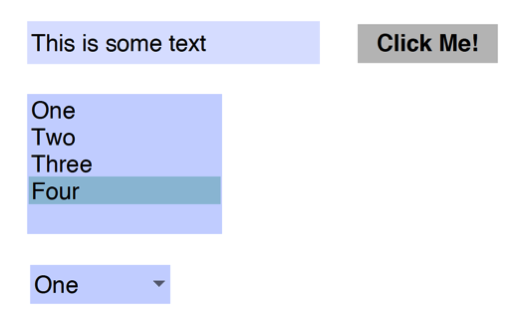
The original form fields:

Screen shot showing differnet form field types (text box, button, dropdown and list control) in their unrotated state.

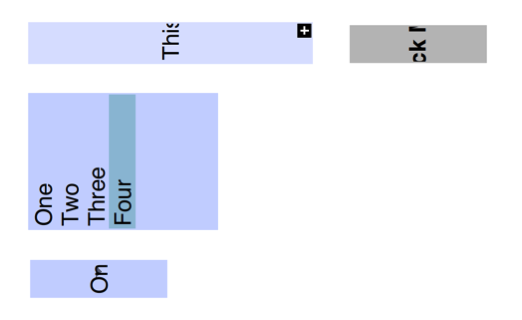
And the same after the fields are rotated by 90 degrees:

Screen shot showing the same form fields as before, but after a 90 degree rotation was applied, the content is rotated, but the fields are still in the same location as before, and have the same size. This means that the content is cut off.

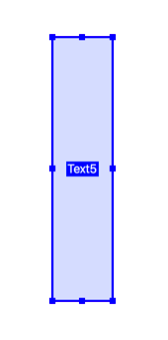
It’s pretty obvious that there is something wrong here: The only thing that was rotated is the form field content, but the field’s location, width and height are the same as before. When we take a step back and look at how a rotated form field is placed in a form, that makes sense: We would first draw the outline of e.g. a text field, and that would very likely be taller than it’s wide:

Screen shot of a text field that is taller than it's wide

And, in a second step, you would then change the rotation of the field on its properties dialog:

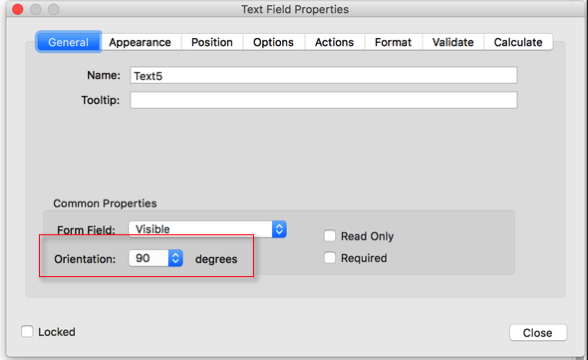
Screen shot of a field properties dialog with the field rotation set to 90 degrees

This will then result in correctly aligned text in that text field. That is different when we have a text field that is meant for horizontal text, and then we rotate the field content as we’ve done in the first example. To make this work, we have to both rotate the field content (easily done by setting the rotation property) and we have to resize the field, which is a bit more complicated.

The first thing we have to decide is which corner of the field should stay where it is, which in turn identifies the three corners that need to change their location. In the following example, I skip this problem, it does add some complexity to the solution. For now, you would have to move the rotated form field into place manually – which is much simpler to do, compared with having to resize the field by hand and then setting the rotation flag. You can use this code as a custom command, or just run it in the JavaScript console. If you do run the code in the console, it’s very easy to run it four times and loop through the four different field rotations of 0, 90, 180 and 270 degrees.

The snippet first gets the currently set rotation (which may not be 0 degrees), and then applies a 90 degree rotation to whatever it found. In addition to that, it also swaps coordinate components. This is where you would need to make an adjustment for keeping one of the field corners constant.

There are of course no limits in how you can improve this snippet. The number one priority would probably be to keep the rotated field in the same area as the original field. You can also add some logic to only rotate certain fields by checking the field names again e.g. an array of fields to rotate. You can filter by field type and e.g. only rotate text fields and dropdown controls.

Posted in Acrobat, JavaScript, PDF, Tutorial | 13 Comments

New Form Field Types in Acrobat DC: Image Field and Date Picker

This morning Adobe released an update for the “Continuous” track of Adobe Acrobat DC – this means that anybody with a subscription will be able to install this update and get new features.

There are a number of new and improved features, which you can look up in the release notes, or in the New Features Summary: https://helpx.adobe.com/acrobat/using/whats-new.html

For me, the two most attractive new features are two new field types when creating PDF forms:

Two new icons on the Acrobat toolbar when editing PDF forms

  • Date Picker
  • Image Field

Let’s first look at the Date Picker:

2017 01 10 12 18 28

When the “Add a Date Field” tool is selected, the user can add a new date field to a PDF form. The actual process is the same as for all the other field types, and once placed, the new field looks just like a text field. The reason for this is that the field is actually a text field, but with the format already set to one of the date options. Once a form with such a date field is filled out, the appearance of the field is now different from a regular text field:

Date field with a triangle indicator that more information will be available when clicked on

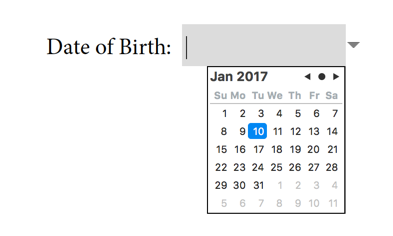
The field now shows a triangle on the right side that indicates that more functionality will be exposed once the user clicks on that triangle – and that’s how we display the date picker:

2017 01 10 11 48 51

The user can still just type a date, just like before, but the date field can now also be populated by using the date picker. There have been 3rd party date pickers for PDF forms in the past, but this is the first time that this feature is built right into Adobe Acrobat and the free Adobe Reader.

When a date field is placed using this new method, a new default field name will be used, but the user can of course change that to fit any naming convention used in a form.

What’s even more exciting is that you don’t have to change all your forms that ask for date input: The “Add a Date Field” tool is just a shortcut for adding a text field and then changing the field formatting to be of a date type. This means that any old form that uses text fields with date formatting will automatically display the date picker when opened in the latest version of Adobe Acrobat or the free Adobe Reader. Yay!

The image field is also a shortcut, but with something extra thrown in. In the past, you could create an image field by creating a button, setting some of the button’s appearance options, selecting to use a button icon, and then running a one line JavaScript to set the button icon to an image that the user could select. This is now all set automatically when the “Add an Image field” function is used:

Just like if we would do this manually, we can now see that this button uses this line of JavaScript:

event.target.buttonImportIcon();

Which means that when the user clicks on that button, Field.buttonImportIcon() method will be executed and because it’s called without parameters, it will prompt the user to select a file.

Here is the really cool thing about this last round of Acrobat/Reader updates: In the past, when a user tried to select a file in the free Adobe Reader, only PDF files could be selected, whereas with Adobe Acrobat, PDF files and all supported image formats could be selected. In the new version of Adobe Reader, we can now also select image files. This makes things a lot easier for users of the free Reader – they no longer have to figure out how to convert an image to a PDF file. The image can now be selected and stored in the PDF file without any additional work.

If you have not yet updated your Adobe Acrobat DC subscription version or your Adobe Reader DC, select the “Check for Updates” function in the application’s “Help” menu so that you can take advantage of this new functionality.

Posted in Uncategorized | Tagged , , , , | 31 Comments

Learning to Program JavaScript for Adobe Acrobat

This is a bit longer than usual, so let me add a table of contents here that allows you to jump straight to the section you are interested in.

JavaScript in Acrobat

Programming JavaScript for Acrobat is simple: Just use the JavaScript core language, avoid any browser specific extensions to the JavaScript language and become familiar with the Acrobat JavaScript API…

… that is if you are already a JavaScript expert, and know where exactly the boundary between the core language and these browser specific extensions are.

So let’s take a step back and see how one can learn to program in JavaScript for Acrobat from scratch.

What is JavaScript?

Back in the early days of the World Wide Web, JavaScript was created in 1995 as an extension language for the Netscape browser. If you want to learn more about it’s history, feel free to explore the JavaScript Wikipedia page.

Since then, it came a long way, and left it’s browser-only heritage behind. It is now available for a number of different environments. Adobe uses it as it’s “ExtendScript” to automate different Creative Cloud applications (Photoshop, InDesign, Illustrator, …), but also in Adobe Acrobat (and that’s very likely why you are here, reading this blog post). Any JavaScript implementation consists of two parts:

  • The JavaScript “core” language
  • Application specific extensions

All JavaScript implementations have the first part in common, and as long as we ignore changes over time in that core language part, any script written with just these core language elements should run in any JavaScript environment. It covers the syntax of the language, basic types like numbers and booleans, and more complex types like strings or arrays, but also “library” objects like Date, RegEx and JSON, so when you have to perform date calculations for example, you can do this by just looking up what methods the Date object provides.

On top of this core language, to actually interact with the application that is hosting the JavaScript environment (web browser, Adobe Acrobat, Node.js server, …) we need to add some application specific “stuff” to the mix. And this is where things differ completely between different JavaScript environments. JavaScript running in the browser knows about web pages, and elements on a web page, HTML connections, and more web specific things, whereas the Acrobat environment does not care about these things, but knows about PDF documents, annotations, form fields and more things that are important in the world of PDF.

Learning the JavaScript Core Language

So, to learn JavaScript for Acrobat, you just take any introductory JavaScript book, class or tutorial and just read and learn the parts about the core language, and ignore the rest. Unfortunately it’s not that simple: Most training resources for JavaScript assume that you are trying to learn to program for the browser environment, so they mix information that belongs into the core language portion with how the script actually interacts with the browser. This can be simple things like how the script is stored: When you write for the browser, chances are that your script actually lives in an HTML document. To interact with the user, your training resource assumes you can get information from the user by using the “prompt()” method, and present information by modifying the current HTML page.

All this makes it a bit more challenging to learn JavaScript for just Adobe Acrobat and the PDF environment.

There is nothing wrong to just take a JavaScript book, start on page 1 and work through the book, following all examples, and actually using the browser to experiment and develop. The problem comes when you then have to unlearn the things you just worked so hard to learn in order to switch to the Acrobat environment.

I am only aware of a couple of resources that provide a fairly clean breakdown of just the core language (that does not mean that there are not more, but I have not seen them. If you know of one, please post in the comments):

Flanagan’s book is the definitive guide, with a large chapter about the core language, but it’s a bit dry and probably not well suited for somebody who is just starting out. For a programmer with a good foundation in any other programming language, this would be a great resource. Simpson’s book is a short introduction into the core language. You can run all the examples from both books in Acrobat if you keep a few simple rules in mind:

Differences (console.log)

Acrobat’s JavaScript console object does not support the log() method. Instead of console.log(“abc”); you will have to use console.println(“abc”);.

This will work in most cases, but the log() method is a bit more powerful than Acrobat’s println(), so you may end up with a few examples for which you will have to modify the arguments to the log call (even though I did not find any when I browsed through the examples in both books):

console.log() concatenates it’s arguments

This will print the line “abc def” – it will concatenate the individual strings. This also works with variables:

This will print “My first car was a Dodge Charger”.

To implement this with Acrobat’s println(), you would use the normal JavaScript string concatenation:

I had to add a space at the end of the first string to get the same output as with log().

console.log() allows substitution strings

This can be rewritten using Acrobat’s util.printf().

In addition to the console.log() function, you also need to change all instances of alert() and prompt() as explained below.

More Books

For any other resource, you have to take the examples presented, and covert them to what Acrobat expects you to use. I’ve looked at two more books that seem to give a reasonably good introduction into the core language, but you will have to pick and choose which areas you need to skip.

In these books (and probably most other JavaScript books), the JavaScript examples are wrapped in HTML, and you have to identify where the script is, extract it and then potentially modify it to make it run within Acrobat. Here is an example of what you might find:

You can open this as example_1.html and see what it does in your browser.

The only thing that is interesting for us is the text inside the <script> tag – that is everything between <script> and </script>:

How do we run this code in Acrobat?

Now that we have the script we need to run, how do we run it in Acrobat’s JavaScript console? Thom Parker already did an excellent job explaining this Acrobat feature, so there is no need to do this again.
Here is his tutorial about how to run code in Acrobat’s JavaScript console: https://acrobatusers.com/tutorials/javascript_console

More Differences (alert and prompt)

When we try to run the above line of code, Acrobat will report an error on the JavaScript console:

In this console log, we have four lines: The first line is the one that was executed, the second line gives us an error message, the third line tells us where the error occurred, and the last line shows the return value of what we’ve executed. The message “undefined” sounds bad, that that’s actually what we would expect when running a command that does not return a value – or in this case, when JavaScript command we were trying to run failed.

The JavaScript interpreter is telling us that “alert is not defined”. This is one of these differences between the application specific extensions that sneaks into the description of the core language: Every web browser will display an alert message box when this line of JavaScript gets executed, but Acrobat does not know about the alert() function. Acrobat does however provide very similar functionality via the app.alert() method. See the description in the SDK documentation for more information. We can use the simplest form of app.alert() to replace the alert() call in our example:

After executing this line, a window pops up:

Dialog window that shows 'This is a message' and an 'OK' button

And, I get this in the JavaScript console:

The first line again is the code I am executing, the second line shows the return value of what got executed. From the API documentation (see link above), we learn that a return code of “1” means that the “OK” button was pressed (which is actually the only button that was on our dialog, but the app.alert() method allows to add more than just one button).

This takes care of informing the user about what our program did. Often there is also a requirement to ask the user for input. In a web browser, the JavaScript program would use the prompt() function, which again does not exist in Acrobat (this is example2.html):

And just as before, the code we are interested in is within the <script> tag:

We already know what to do with the second line, to replace the prompt() function call with something that Acrobat understands, we will use the app.response() method. For more information about this method, see the Acrobat JavaScript API Reference.

This results in these two windows being displayed:

Dialog window asking the user to enter a value. The screenshot shows that the value '23' was entered.

Dialog window that shows the message 'You entered 23'

Any time a script references window or document, we are dealing with a script that cannot be easily be converted to Acrobat’s JavaScript.

A Book Just About JavaScript for Adobe Acrobat

If you are looking for a book that only talks about JavaScript for Acrobat, and also introduces you to how these scripts are used in Acrobat, take a look at John Deubert’s Beginning JavaScript for Adobe Acrobat

Further Steps

Once you have a good understanding of the core language, you need to become familiar with how JavaScript is used in Acrobat. A good introduction is the document “Developing Acrobat Applications Using JavaScript” in the Acrobat SDK, followed by the dry but necessary “JavaScript for Acrobat API Reference“.

If you need any help in learning JavaScript, or in how it is used with and in Adobe Acrobat, keep in mind that I do run a consulting business and part of what I do is to provide training.

Full disclosure: Some of the links to books on this page use my Amazon affiliate link, so when you order through one of these links, I will get a few cents.

Posted in Acrobat, JavaScript | Tagged , , , | 2 Comments