Learning to Program JavaScript for Adobe Acrobat

This is a bit longer than usual, so let me add a table of contents here that allows you to jump straight to the section you are interested in.

JavaScript in Acrobat

Programming JavaScript for Acrobat is simple: Just use the JavaScript core language, avoid any browser specific extensions to the JavaScript language and become familiar with the Acrobat JavaScript API…

… that is if you are already a JavaScript expert, and know where exactly the boundary between the core language and these browser specific extensions are.

So let’s take a step back and see how one can learn to program in JavaScript for Acrobat from scratch.

What is JavaScript?

Back in the early days of the World Wide Web, JavaScript was created in 1995 as an extension language for the Netscape browser. If you want to learn more about it’s history, feel free to explore the JavaScript Wikipedia page.

Since then, it came a long way, and left it’s browser-only heritage behind. It is now available for a number of different environments. Adobe uses it as it’s “ExtendScript” to automate different Creative Cloud applications (Photoshop, InDesign, Illustrator, …), but also in Adobe Acrobat (and that’s very likely why you are here, reading this blog post). Any JavaScript implementation consists of two parts:

  • The JavaScript “core” language
  • Application specific extensions

All JavaScript implementations have the first part in common, and as long as we ignore changes over time in that core language part, any script written with just these core language elements should run in any JavaScript environment. It covers the syntax of the language, basic types like numbers and booleans, and more complex types like strings or arrays, but also “library” objects like Date, RegEx and JSON, so when you have to perform date calculations for example, you can do this by just looking up what methods the Date object provides.

On top of this core language, to actually interact with the application that is hosting the JavaScript environment (web browser, Adobe Acrobat, Node.js server, …) we need to add some application specific “stuff” to the mix. And this is where things differ completely between different JavaScript environments. JavaScript running in the browser knows about web pages, and elements on a web page, HTML connections, and more web specific things, whereas the Acrobat environment does not care about these things, but knows about PDF documents, annotations, form fields and more things that are important in the world of PDF.

Learning the JavaScript Core Language

So, to learn JavaScript for Acrobat, you just take any introductory JavaScript book, class or tutorial and just read and learn the parts about the core language, and ignore the rest. Unfortunately it’s not that simple: Most training resources for JavaScript assume that you are trying to learn to program for the browser environment, so they mix information that belongs into the core language portion with how the script actually interacts with the browser. This can be simple things like how the script is stored: When you write for the browser, chances are that your script actually lives in an HTML document. To interact with the user, your training resource assumes you can get information from the user by using the “prompt()” method, and present information by modifying the current HTML page.

All this makes it a bit more challenging to learn JavaScript for just Adobe Acrobat and the PDF environment.

There is nothing wrong to just take a JavaScript book, start on page 1 and work through the book, following all examples, and actually using the browser to experiment and develop. The problem comes when you then have to unlearn the things you just worked so hard to learn in order to switch to the Acrobat environment.

I am only aware of a couple of resources that provide a fairly clean breakdown of just the core language (that does not mean that there are not more, but I have not seen them. If you know of one, please post in the comments):

Flanagan’s book is the definitive guide, with a large chapter about the core language, but it’s a bit dry and probably not well suited for somebody who is just starting out. For a programmer with a good foundation in any other programming language, this would be a great resource. Simpson’s book is a short introduction into the core language. You can run all the examples from both books in Acrobat if you keep a few simple rules in mind:

Differences (console.log)

Acrobat’s JavaScript console object does not support the log() method. Instead of console.log(“abc”); you will have to use console.println(“abc”);.

This will work in most cases, but the log() method is a bit more powerful than Acrobat’s println(), so you may end up with a few examples for which you will have to modify the arguments to the log call (even though I did not find any when I browsed through the examples in both books):

console.log() concatenates it’s arguments

This will print the line “abc def” – it will concatenate the individual strings. This also works with variables:

This will print “My first car was a Dodge Charger”.

To implement this with Acrobat’s println(), you would use the normal JavaScript string concatenation:

I had to add a space at the end of the first string to get the same output as with log().

console.log() allows substitution strings

This can be rewritten using Acrobat’s util.printf().

In addition to the console.log() function, you also need to change all instances of alert() and prompt() as explained below.

More Books

For any other resource, you have to take the examples presented, and covert them to what Acrobat expects you to use. I’ve looked at two more books that seem to give a reasonably good introduction into the core language, but you will have to pick and choose which areas you need to skip.

In these books (and probably most other JavaScript books), the JavaScript examples are wrapped in HTML, and you have to identify where the script is, extract it and then potentially modify it to make it run within Acrobat. Here is an example of what you might find:

You can open this as example_1.html and see what it does in your browser.

The only thing that is interesting for us is the text inside the <script> tag – that is everything between <script> and </script>:

How do we run this code in Acrobat?

Now that we have the script we need to run, how do we run it in Acrobat’s JavaScript console? Thom Parker already did an excellent job explaining this Acrobat feature, so there is no need to do this again.
Here is his tutorial about how to run code in Acrobat’s JavaScript console: https://acrobatusers.com/tutorials/javascript_console

More Differences (alert and prompt)

When we try to run the above line of code, Acrobat will report an error on the JavaScript console:

In this console log, we have four lines: The first line is the one that was executed, the second line gives us an error message, the third line tells us where the error occurred, and the last line shows the return value of what we’ve executed. The message “undefined” sounds bad, that that’s actually what we would expect when running a command that does not return a value – or in this case, when JavaScript command we were trying to run failed.

The JavaScript interpreter is telling us that “alert is not defined”. This is one of these differences between the application specific extensions that sneaks into the description of the core language: Every web browser will display an alert message box when this line of JavaScript gets executed, but Acrobat does not know about the alert() function. Acrobat does however provide very similar functionality via the app.alert() method. See the description in the SDK documentation for more information. We can use the simplest form of app.alert() to replace the alert() call in our example:

After executing this line, a window pops up:
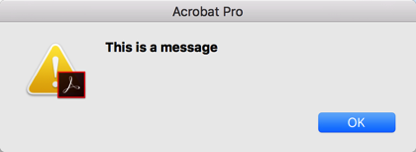
Dialog window that shows 'This is a message' and an 'OK' button

And, I get this in the JavaScript console:

The first line again is the code I am executing, the second line shows the return value of what got executed. From the API documentation (see link above), we learn that a return code of “1” means that the “OK” button was pressed (which is actually the only button that was on our dialog, but the app.alert() method allows to add more than just one button).

This takes care of informing the user about what our program did. Often there is also a requirement to ask the user for input. In a web browser, the JavaScript program would use the prompt() function, which again does not exist in Acrobat (this is example2.html):

And just as before, the code we are interested in is within the <script> tag:

We already know what to do with the second line, to replace the prompt() function call with something that Acrobat understands, we will use the app.response() method. For more information about this method, see the Acrobat JavaScript API Reference.

This results in these two windows being displayed:

Dialog window asking the user to enter a value. The screenshot shows that the value '23' was entered.

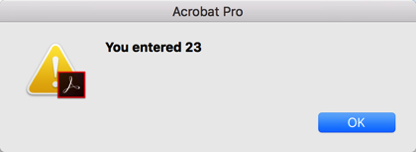
Dialog window that shows the message 'You entered 23'

Any time a script references window or document, we are dealing with a script that cannot be easily be converted to Acrobat’s JavaScript.

A Book Just About JavaScript for Adobe Acrobat

If you are looking for a book that only talks about JavaScript for Acrobat, and also introduces you to how these scripts are used in Acrobat, take a look at John Deubert’s Beginning JavaScript for Adobe Acrobat

Further Steps

Once you have a good understanding of the core language, you need to become familiar with how JavaScript is used in Acrobat. A good introduction is the document “Developing Acrobat Applications Using JavaScript” in the Acrobat SDK, followed by the dry but necessary “JavaScript for Acrobat API Reference“.

If you need any help in learning JavaScript, or in how it is used with and in Adobe Acrobat, keep in mind that I do run a consulting business and part of what I do is to provide training.

Full disclosure: Some of the links to books on this page use my Amazon affiliate link, so when you order through one of these links, I will get a few cents.
Posted in Acrobat, JavaScript | Tagged , , , | 2 Comments

Mark Selected Options with Circles in PDF Forms

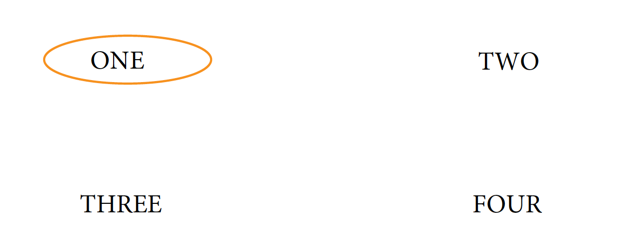
I assume you’ve filled out a paper form with a pen, and circled one or more of the options presented on the form. Can this be done in a PDF form as well?

2016 11 11 11 59 18

To create such a form, we cannot just use the standard PDF form field types, we need to be a bit more inventive. A while ago, I answered a question to do just that with two options (“Yes” and “No”) on the now read-only AcrobatUsers.com: https://answers.acrobatusers.com/Circle-PDF-clicking-it-q290981.aspx

For a scenario where more than two buttons need to be part of such a group, or for a more flexible approach, I modified the script presented in the AcrobatUsers.com post.

Here are the steps to a complete solution:

Create a PDF file containing just the “circle” (or the oval) you want to use to circle the options in your form. You can do this in e.g. Adobe Illustrator or Adobe Photoshop. Make sure that the inside of the circle/oval is transparent, otherwise you will not see the selected option “through” the circle.

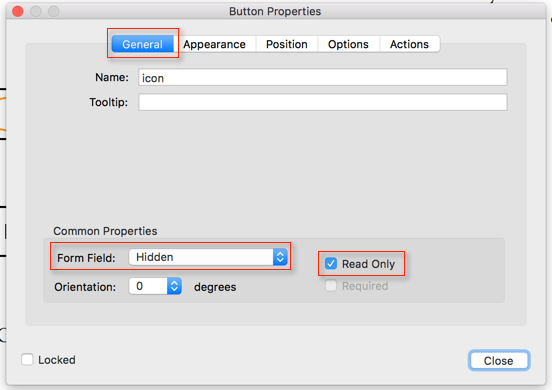
Create your form with all the options you want to be circled as part of the form “background”. Then create one button field that uses the circle/oval image from above as it’s button icon. This button will not be used to interact with the user, it’s purpose is to store the button icon (the circle/oval), and it will eventually be read-only and hidden, so place it anywhere on the form where it does not interfere with other buttons you want to place. Now bring up the properties dialog for this new button. The selections on the properties dialog that need to be changed are outlined here:

On the “General” tab select to make this button read-only and hidden. Again, we are only using this first button to store the icon image, so there is no need to show this button to the user, or let the user interact with it. I am calling this button “icon”, if you select to change the button name, keep in mind that the same name needs to be used in the button action script below.

On the \

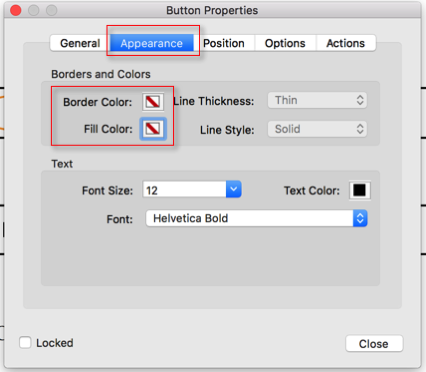
On the “Appearance” tab set both the border color and the background color to “transparent”. This setting also needs to be applied to the other buttons we will add to this form.

On the \

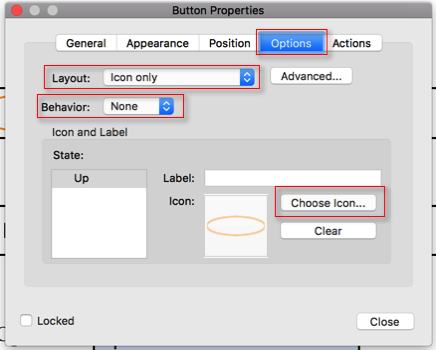
On the “Options” tab select to use an “icon only” layout, and set the “Behavior” to “None”, then select the PDF document that contains your circle/oval icon from above.

On the \

Now add the other buttons to your document that we will use to select options on the form. For now, I am only considereing one group of buttons called “Button1” – the individual buttons in the group will have names like “Button1.Opt1”, “Button1.Opt2” and so on. You can use any descriptive name for the last part of the button name, as long as it does not contain a period.

Setup these buttons with transparent border and background color as described above. Now use the following script as the “Mouse Up” action script on the buttons’ “Action” tab:

var baseName;
var currentState;

// get our name
var theName = event.target.name;

var re = /(.*)\.(.*)/;

var ar = re.exec(theName);

if (ar.length > 0) {
    baseName = ar[1]; 
    currentState = ar[2];

    // make this button visible
    event.target.buttonSetIcon(this.getField("icon").buttonGetIcon());
    event.target.buttonPosition = position.iconOnly;
    
    // hide the other button
    var f_parent = this.getField(baseName);
    var f = f_parent.getArray();
    for (var i in f) {
        if (f[i].name != theName) {
            f[i].buttonPosition = position.textOnly;
       }
    }
}

this.calculateNow();    // this line is only required if the status of the 
                        // selected button needs to be processed

This script will set the button that you clicked on to use the surrounding circle/oval as it’s button image, and it will remove it from all other buttons in the same group. You may notice that we never actually make assumptions about what these options (or the button names) are – it’s all handled automatically.

This should give you the correct behavior for all the buttons on the group – whatever option you select will be circled. However, if the selection needs to be further processed in your form, we have one more hurdle ahead of us: With a “normal” form that uses radio buttons or checkboxes to indicate a selection, it’s very easy to get the selected value. With our “circle the selected item” form, that is not as simple. Let’s say you want add a text field to the form that should display the value you’ve circled. The following code – when used as custom calculation script for that field – will get the current selection, and will then display it in the text field:

var selection = "";

// get the "Button1" group of fields:

var f_button1 = this.getField("Button1");

var f = f_button1.getArray();

for (var i in f) {
    if (f[i].buttonPosition == position.iconOnly) {
        // get the last part of the field name (e.g. Button1.Opt1 -> Opt1)
        var idx = f[i].name.lastIndexOf(".");
        if (idx > 0) {
            selection = f[i].name.substring(idx+1);
        }
    }
}

event.value = selection;

For this to work, the form needs to be recalculated whenever a button is pushed. This does not happen automatically, that’s why we are calling the ‘calculateNow()’ method at the end of the button action scripts.

Here is a functioning PDF file that has all the scripts in it: circle_button.pdf And here is the Adobe Illustrator file with the oval: circle_button_icon.pdf

Posted in Uncategorized | Tagged , , , , | 5 Comments

Adobe Acrobat’s File Open or Save Dialogs are Slow or Hanging – Here is the Fix!

Is your File Open or File Save/Save As dialog slow to open, or does it look like it’s hanging and never actually coming up? If you are running Adobe Acrobat or Adobe Reader version DC, the fix for this is easy:

In Adobe Acrobat DC, the operating system’s file dialogs are replaced by Acrobat’s own dialog that allows you to pick a file from the recently used list, from Adobe’s online services “Document Cloud” and “Creative Cloud”, other online storage solutions (e.g. Dropbox, Box, OneDrive and SharePoint sites), and finally files on your local system.

OpenDialog

It takes time to connect to all these online services to see if they are available, and if one is slow to reply, it may actually look like the dialog is hanging completely.

To avoid these performance problems, these online services can be turned off. To do that, open Acrobat’s Preferences, go to the “General” category and uncheck the two “Show online storage…” options:

Preferences

Once this change is made, Acrobat will use the operating system’s file selection dialog directly. This also means that the online storage services are no longer available via an almost one-click access method. It would be nice to have a way to select which dialog comes up by default, and be able to bring the other one up when necessary without having to go through the Preference settings. If this is something you want to see, join me in filing an Enhancement Request for Adobe Acrobat.

Posted in Acrobat, PDF | Tagged , , , , , , | 5 Comments

Getting a Serial Number Into a Form Using SOAP

One request that shows up again and again on the Adobe Forums (or in the past on AcrobatUsers.com) is about how to generate a unique serial number or form number in a PDF file. The scenario is usually something like this: A user creates documents (e.g. quotes or orders) that need to be numbered in a sequential manner so that no forms will use the same number. There are a number of solution available that work well as long as all these forms are always processed by the same user on the same computer. This is accomplished by storing the number in JavaScript in e.g. another form, or in global JavaScript data.

How can the same functionality be implemented if the requirement is to use this on multiple computers, or by multiple users? Allowing access from multiple environments complicates things quite a bit. To allow concurrent access to the “serial number generator”, we need to move the solution to a server. There are different mechanisms how Acrobat can access a server, for the following discussion, I want to use a web service via the SOAP interface, which is documented in the Acrobat JavaScript API: SOAP and Web Services

Explaining what SOAP is and what it’s used for is outside of the scope of this post. If you want to learn more about SOAP, take a look here: SOAP on Wikipedia

Implementing such a solution requires two parts:

  • A JavaScript program running in the form
  • The actual web service running on a server.

When I say “server’, I use that term in a very broad sense, and that could mean that you run the software on an actual server (running e.g. Windows Server, Mac OS Server, Linux, ..) or on a normal workstation that is running server software. You can install for example the free XAMPP software on a Windows 10 computer and still get the same behavior as you would with a real server system.

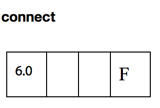
Before we get too far into this, when you review the requirements for the SOAP calls in Acrobat’s JavaScript implementation, you will notice the “F” in the quick bar:

2016 06 12 12 42 02

This means that this feature is only available in the free Adobe Reader if “Forms” rights are applied to the document. Even though Adobe Acrobat can apply some extended Reader rights to a document, for the “Forms” rights, the LiveCycle Reader Extensions software is necessary. For the purpose of this tutorial, the presented solution will only work if you are using Adobe Acrobat (version 6 and later) and not the free Adobe Reader.

The solution we want to create is a form that has at least two fields: One that will eventually contain the form number – or serial number – and one that contains the name of the person filling out the form, or the name of the person the form was created for. In addition to these two, the form can contain any number of fields. We also need a mechanism to request a new serial number – in the sample below, that will be done using a button. When a new serial number is generated, I also want to store the user name and the current time and date so that I can go back later and find out what documents were processed and either by what user, or for which customer (depending on how I use that user name field).

To make things easier on the implementation in the actual PDF form, let’s start with creating the web service that provides these unique numbers and stores information about the request to generate such a number.

This web service should provide a function named “getSerialNumber()”, which takes one argument (the user name), and returns a string containing a new number. Web services can be written in any number of languages. Oftentimes web services are written in Java and are then executed in an application server like Apache Tomcat. For this sample implementation, I selected a web service written in PHP. This has the advantage that it will run on Windows, Linux, Mac OS, and any other system that provides support for PHP. The XAMPP system mentioned above does come with a PHP interpreter and Apache’s web server configured to use PHP. Setting up a web service in PHP based on just the documentation is not straight forward, and I found a lot of help here: A Complete PHP SOAP Server Example If you want to understand more about how all these pieces are working together, you may want to spend some time on that site.

The big question now is how can one create a unique and sequential number? I am going to use a database for that: When you define a field as the primary key in a MySQL database, you end up with such a unique and sequential number. For every new record, that index gets automatically incremented, starting with the value 1 for the first record.

The following PHP script implements such a system that writes the user name and the current date to a database, and then returns the index for that new record:

<?php
    function getNextSerial($userName) {
        // open a database connection and insert a new record, get the last used index and return that
        $mysqli = new mysqli("localhost", "theUser", "thePassword", "serialnumbers");

        // check connection
        if (mysqli_connect_errno()) {
            printf("Connect failed: %s\n", mysqli_connect_error());
            exit();
        }

        $query = "INSERT INTO serialnumbers (username, date) VALUES (\"" . $mysqli->real_escape_string($userName) . "\", NOW())";
        $mysqli->query($query);

        $idx = $mysqli->insert_id;	// get the unique index of the just inserted record

        // close connection
        $mysqli->close();
        
        return $idx;
    }
    
    // Disable the wsdl cache
    ini_set("soap.wsdl_cache_enabled", "0");

    // Define the response class for getSerial()
    class getSerialResponse{
        public $return;
    }

    // Define the class and methods for the object that gets passed to setClass 
    class getSerialClass{
        public function getSerialNumber($parameters){
            // Instantiate the response class
            $response = new getSerialResponse();
            // Return the next available serial number
            $response->return = getNextSerial($parameters->userName);
            return $response;
        }
    }   

    // Create a new server
    $server = new SoapServer("GetSerialNumber.wsdl");

    // Set the class for the server
    $server->setClass("getSerialClass");

    // Handle the soap operations
    $server->handle();
?>

This assumes that a WSDL file named “GetSerialNumber.wsdl” is in the same directory as this PHP file, and this WSDL file in turn is referencing a schema file that also needs to be in the same directory.

You can learn about how to manually create a WSDL file here: How to Generate WSDL for PHP SOAP Server – With a recent version of NetBeans, there is one more step involved that is not documented in the tutorial: You need to open the generated WSDL and replace “REPLACE_WITH_ACTUAL_URL” with the actual URL of your web service PHP file.

You can download all files referenced in this post here: GetSerial.zip

So, what does this do? It defines one web service routine called “getSerialNumber()” which takes one string parameter (the user name) and returns a string
containing the new serial number. It does that by calling the “getNextSerial()” function, which opens a connection to a MySQL database and inserts a new record using that user name and the current time and date. It then returns the index of the just inserted record.

Here are the MySQL commands to create the database, the table and a user that can modify the table:

CREATE DATABASE serialnumbers;
CREATE TABLE serialnumbers (idx INT(6) UNSIGNED AUTO_INCREMENT PRIMARY KEY, username VARCHAR(30), date TIMESTAMP);

CREATE USER 'newuser'@'localhost' IDENTIFIED BY 'password';
GRANT INSERT,SELECT ON serialnumbers to 'theUser'@'localhost';

Now to the JavaScript code that runs in the PDF form: In my sample document, I have two fields, one name field, and one serial number field plus a button that when pressed takes the information from the user name field, generates a new serial number and populates the respective field and then hides the button so that you cannot keep on clicking on it and therefore “waste” serial numbers.

// Obtain the WSDL proxy object:
var myProxy = Net.SOAP.connect("http://localhost/GetSerial/GetSerialNumber.wsdl?wsdl");

// get the user name from a field
var userName = this.getField("UserName").value;
if (userName != "") {
    var result = myProxy.getSerialNumber(userName);
    this.getField("Result").value = util.printf("%04d", Number(result));
    // hide this button
    event.target.display = display.hidden;
}
else {
    app.alert("Please fill in a user name");
}  

2016 06 12 14 46 36

In the first step, we load the WSDL file that was installed with our PHP web service, then we get the contents of the “UserName” field and if that is a non empty string, we request a new serial number via the SOAP proxy object. We then take that result, interpret it as a number and format it so that it has leading zeros. The last thing we do is to hide the button that was used to generate the serial number. There could be more error checking and exception handling in this code, but I did not want to clutter up the actual functionality with that. For example, you need to check that the user name provided is not longer than 30 characters (that’s what we used to define the length of the VARCHAR field in the database table).

2016 06 12 14 46 58

When you try to use these files, you have to make sure that you adjust all URLs that are used in both JavaScript and PHP code so that they match your installation. I had things installed in http://localhost/GetSerial – you would have to search for that string and replace it with the correct path to the directory in your installation.

My tutorials are usually pretty simple to follow. This is a bit more complex and requires you to setup a web server, the PHP system running in that server, a database server with a database and then at the very end a few lines of JavaScript code in a PDF form. I have to assume that whoever wants to tackle this does know how to work with all these different technologies. If this is a bit too much for you, please ask me for a quote to implement such a solution for you.

Posted in Acrobat, JavaScript, PDF, Programming, Tutorial | Tagged , , , , , , | 2 Comments

Selective Flattening of Form Fields Using ABCpdf

Let’s assume you have a form with a lot of form fields, and somewhere during your forms workflow, you want to flatten some fields to “burn in” the information and convert it from an interactive field to static PDF content. There are different ways to accomplish this. One option is to do this all in Acrobat’s JavaScript. Unfortunately, when you lookup the documentation for the Doc.flattenPages() method, it does not talk about selecting only a subset of fields (unless these fields are all on one specific page, and that page does not contain any fields that should not be flattened). But, there is an optional parameter that allows us to specify what should happen to fields that are set to only be displayed in the viewer, but not be printed: The “nNonPrint” parameter, when set to the numeric value “1”, will leave
these fields alone, and will not flatten them (a value of “0” will flatten them and a value of “2” will remove them from the document).

This allows us to modify the document before we call the Doc.flattenPages() method: If we turn all fields that should not be flattened into non-printing fields, then flatten the document, and then in a last step reverse that first change, we can do flatten only a subset of fields. The problem gets a bit more complex when we already have non-printing fields in the document that we want to remain non-printing, or if we have non-printing fields that we want to flatten. That will require quite a bit of logic to save the original state of all fields, turn those fields we want to flatten into printing form fields, turn the fields that we don’t want to flatten into non-printing fields, flatten the document, and then restore the original settings again. As I said, a bit complex.

As long as we don’t need to do this within Acrobat, there is another solution: The ABCpdf library that I’ve mentioned before provides functionality to flatten fields on a per-field basis. [ Full disclosure: The fine folks at webSupergoo provided me with a free license to ABCpdf 8 based on that old blog post. That’s what I am still using for my experiments. They are up to version 10 by now, and based on their feature comparison chart, there are a few new features in this version that sound interesting. ]

Now, when you search for “flattening” in the ABCpdf manual, you won’t find anything that will help you in this case: The only flattening I found in my version is for flattening layers, and versions 9 and 10 support transparency flattening. Nothing about form fields. It took me a bit of head scratching and exploring the Form and Field APIs to figure out that form or field flattening is actually done via a process called “stamping”. Once that hurdle was cleared, it was pretty simple to come with a routine to flatten just one field at a time. Here is the VB code I’ve used (the same will also work in C# or via any of the other interfaces that ABCpdf supports):

' This assumes that we already have an open document 'theDoc'
Dim theField As Field

' set the field 'Text1' to some value
theField = theDoc.Form.Fields("Text1")
theField.Value = "Some value"

' flatten one form field
theField.Stamp()

' flatten all form fields in the document
theDoc.Form.Stamp()

Just to demonstrate how to flatten a whole document, I’ve added that as the last line in this snippet.

This makes it very simple to e.g. define an array of field names to be flattened, and then just loop over that array, get the field, and flatten one at a time.

This feature in ABCpdf is very useful, and easy to use – even though it has a name that is a bit confusing to somebody who works with a different kind of PDF Stamps on a regular basis 🙂

Posted in PDF, Programming | Tagged , , , | Leave a comment

Batch-Import List Data into PDF Form

We’ve talked about batch importing data from an Excel document into a PDF form before: http://khkonsulting.com/2015/10/batch-import-excel-data-into-pdf-forms/

Back then, the idea was that we would have a spreadsheet with rows of data, and every row would be imported into a new copy of the document (e.g. a mail merge type application).

What if we want to import rows of data into one document? Let’s assume, we have a table in our document with 20 rows, and we have a spreadsheet that has the same 20 rows, and we want to import that data. If we would use the method from above, the whole form data would have to be rewritten into a spreadsheet with just one row of data. Let’s do a simple example with a small table:

Firstname Lastname
John Doe
Jane Doe

The data in the PDF file would be organized like this:

Firstname_1 Lastname_1
Firstname_2 Lastname_2

Our datafile would then look like this:

Firstname_1	Lastname_1	Firstname_2	Lastname_2
John	Doe	Jane	Doe

The blank spaces between the entries in the list above are TAB characters – remember, we need a tab separated text file for this to work.

This is simple to do for a small files, but if you are dealing with 100 records of 10 fields each, we are talking about a pretty extensive row of data. It can certainly be done, especially if a VBA macro is used, but it’s not what I would do.

The good news is that this can still be done using JavaScript. The trick is to work with two documents: We of course start out with the document that we want to populate with data, but in addition to that, we are also using a temporary document that has one set of fields for each record we are going to read. This way, we can read one record at a time, and then copy that record into our final form. This temporary form will be created on the fly using JavaScript. And, because we will never actually look at that form, we don’t have to worry about placing the form fields in any meaningful way. In my example further down, I am placing all fields right on top of each other.

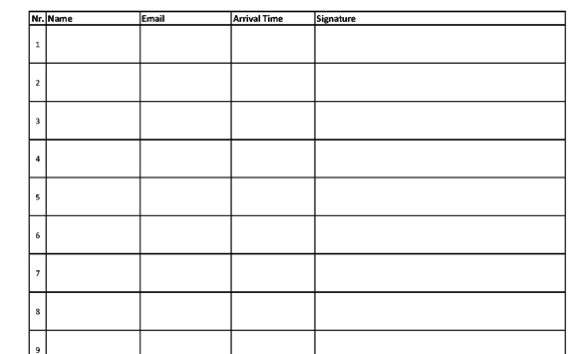
Let’s assume we want to create a sign-in sheet for an event, and we want to print the full name of each participant and the participant’s email address on the form:

Blank form

You can download the documents from these links:

Blank form
Form with fields

The following script can for example be used as an Action, or a custom command in Acrobat DC:

/* Import list data from tab delimited text file */

var dataFile = "/Users/username/data.txt"; // !!! CHANGE THIS !!!

// Create a temporary document and add the three text fields
// that correspond with the three columns in our data file.
var tmpDoc = app.newDoc();
tmpDoc.addField("Firstname", "text", 0, [0, 0, 100, 100]);
tmpDoc.addField("Lastname", "text", 0, [0, 0, 100, 100]);
tmpDoc.addField("Email", "text", 0, [0, 0, 100, 100]);

// Iterate over the data file and import the corresponding record
// from the data file and then copy that data to the corresponding
// data row.
var err = 0;
var idx = 0;
while (err == 0) {
	err = tmpDoc.importTextData(dataFile, idx); // imports the next record

	if (err == -1)
		app.alert("Error: Cannot Open File");
	else if (err == -2)
		app.alert("Error: Cannot Load Data");
	else if (err == 1)
		app.alert("Warning: Missing Data");
	else if (err == 2)
		app.alert("Warning: User Cancelled Row Select");
	else if (err == 3)
		app.alert("Warning: User Cancelled File Select");
	else if (err == 0) {
		// collect the data and add it to the "real" form
		var name = tmpDoc.getField("Lastname").value + ",\n" +
			tmpDoc.getField("Firstname").value;
		var email = tmpDoc.getField("Email").value;

		this.getField("Name" + (idx + 1)).value = name; // we need to adjust the index by one
		this.getField("Email" + (idx + 1)).value = email;
		if (idx == 19) {
			// we can only process 20 records on each sheet
			err = -99;
		}
	}
	idx++;
}

// cleanup
tmpDoc.closeDoc(true);

Here is the sample file I’ve used as Excel Spreadsheet and as tab delimited text file (this is random data thanks to the “Fake Name Generator“.

There are a few potential problems when you are using this approach: First of all, the same limitations that apply to manually importing data apply here as well: You need to make sure that each column in your data file is represented by a field in your temporary file, and that the names match. There cannot be any extra fields either. And, in this particular case, you will have to make sure that you only import up to the same number of records that your document can actually handle. My document uses 20 records, so I am checking for that in my script. If you need continuation pages, you can certainly do that, it would make the script a bit more complex.

If you want to adapt this approach for your own solution, make sure that you add all required fields to your temporary document. In the example above, I am only using text fields, but the same technique can be used for other field types as well.

Let me know if this works for you.

Posted in Acrobat, JavaScript, Tutorial | Tagged , , , , , , | 21 Comments

Using Custom Dynamic PDF Stamps in Adobe Acrobat or Adobe Reader

There is sometimes a misconception about how a custom dynamic stamp works in the PDF environment. Here is a short video that demonstrates how such a stamp gets applied:

As you can see, the custom dialog that collects the data that will be placed as part of the stamp pops up after the stamp is placed. Once all information is entered, and the “OK” button (how that button is labeled is up to the stamp’s implementation) is pressed, that data gets merged into the stamp and the stamp gets displayed. From that point on, that data can no longer be changed. It’s like placing a rubber stamp on a piece of paper. Once it’s there, it can no longer be modified. There are however a few things we can do with a PDF stamp: We can move the stamp, resize and rotate it – as shown in the video.

In the second part of the video, I am demonstrating how to use the “Stamp” tool button on the toolbar. In order to have this button available, you will need to add it to your toolbar. For more information about how to customize the Acrobat user interface, see for example here: http://blogs.adobe.com/acrolaw/2013/03/customizing-the-acrobat-xi-interface/

This article is not supposed to be a “tell all” story about dynamic stamps, I just wanted to demonstrate the basic workflow involved in placing a custom dynamic stamp. If you have questions about these types of stamps, please post in the comments.

Posted in Acrobat, PDF | Tagged , , , , , | 9 Comments

More Missing Characters

A while ago I wrote about missing characters after merging PDF files. Since then, I’ve heard about a few more instances of missing characters and was able to debug one scenario. The following is a record of that. Unfortunately, there is no simple fix for this problem, but more about that at the end.

The symptoms of this problem are a bit different than the old case: Here, the problem is that the documents look good when displayed in Adobe Acrobat or Adobe Reader, but once printed, characters are missing. The first screenshot is from the document displayed in a PDF viewer, the second one shows what the document looked like after being printed:

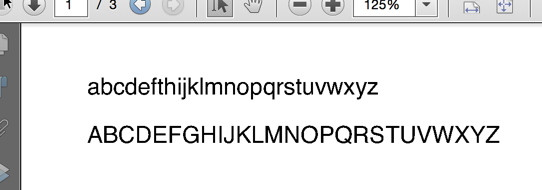
PDF Displayed in PDF Viewer

PDF After Printing

The second line in the printed output clearly is missing characters at the end.

I had two reports about this problem, the common things were that both were using a Mac, and both were printing to network printers. The printers were from three different manufacturers, so it had to be something that crosses vendor boundaries.

A while ago, Apple introduced AirPrint, a mechanism to print from an iOS device without a driver to an AirPrint compatible printer. AirPrint uses the IPP protocol and the URF format. To make things simpler for printer manufacturers, the same mechanism is oftentimes also used for printing outside of the AirPrint environment, e.g. when printing from a Mac to a network connected printer. And that is exactly where we are running into problems with these jobs.

Mac OS X uses the CUPS system as it’s print sub-system. Apple actually purchased the rights to CUPS back in 2007. By now, what’s in Mac OS X is not pure CUPS (which is still open source software), but a proprietary system built on top of CUPS. This makes it a bit harder to figure out what’s going on.

Here is what happens when a PDF document is printed from Adobe Acrobat (or Adobe Reader): Acrobat (or Reader) converts the PDF file to PostScript. This PostScript file is then handed over to the CUPS system. And here, we can use the logging capabilities of CUPS to get information about what happens next: Logging is enabled by changing one line in the configuration file /etc/cups/cupsd.conf – change “LogLevel warn” to “LogLevel debug”. This gives us the following in the log file:

D [27/Oct/2015:11:39:24 -0400] [Job 112] 4 filters for job:
D [27/Oct/2015:11:39:24 -0400] [Job 112] pstoappleps (application/postscript to application/vnd.apple-postscript, cost 10)
D [27/Oct/2015:11:39:24 -0400] [Job 112] pstocupsraster (application/vnd.apple-postscript to image/urf, cost 250)
D [27/Oct/2015:11:39:24 -0400] [Job 112] - (image/urf to printer/EPSON_WF_3520_Series/image/urf, cost 10)
D [27/Oct/2015:11:39:24 -0400] [Job 112] - (printer/EPSON_WF_3520_Series/image/urf to printer/EPSON_WF_3520_Series, cost 0)
D [27/Oct/2015:11:39:24 -0400] [Job 112] job-sheets=none,none
D [27/Oct/2015:11:39:24 -0400] [Job 112] argv[0]="EPSON_WF_3520_Series"
D [27/Oct/2015:11:39:24 -0400] [Job 112] argv[1]="112"
D [27/Oct/2015:11:39:24 -0400] [Job 112] argv[2]="khk"
D [27/Oct/2015:11:39:24 -0400] [Job 112] argv[3]="parts_combined.pdf"
D [27/Oct/2015:11:39:24 -0400] [Job 112] argv[4]="1"
D [27/Oct/2015:11:39:24 -0400] [Job 112] argv[5]="AP_ColorMatchingMode=AP_ApplicationColorMatching AP_D_InputSlot= nocollate com.apple.print.DocumentTicket.PMSpoolFormat=application/pdf com.apple.print.JobInfo.PMJobName=parts_combined.pdf com.apple.print.PrinterInfo.PMColorDeviceID..n.=18333 com.apple.print.PrintSettings.PMCopies..n.=1 com.apple.print.PrintSettings.PMCopyCollate..b. com.apple.print.PrintSettings.PMFirstPage..n.=1 com.apple.print.PrintSettings.PMLastPage..n.=2147483647 com.apple.print.PrintSettings.PMPageRange..a.0..n.=1 com.apple.print.PrintSettings.PMPageRange..a.1..n.=2147483647 media=Letter pserrorhandler-requested=standard job-uuid=urn:uuid:68eacf38-6a65-3c4f-7a67-3e90cb0c7bc3 job-originating-host-name=localhost time-at-creation=1445960364 time-at-processing=1445960364 PageSize=Letter"
D [27/Oct/2015:11:39:24 -0400] [Job 112] argv[6]="/private/var/spool/cups/d00112-001"
D [27/Oct/2015:11:39:24 -0400] [Job 112] envp[0]=""
D [27/Oct/2015:11:39:24 -0400] [Job 112] envp[1]="CUPS_CACHEDIR=/private/var/spool/cups/cache"
D [27/Oct/2015:11:39:24 -0400] [Job 112] envp[2]="CUPS_DATADIR=/usr/share/cups"
D [27/Oct/2015:11:39:24 -0400] [Job 112] envp[3]="CUPS_DOCROOT=/usr/share/doc/cups"
D [27/Oct/2015:11:39:24 -0400] [Job 112] envp[4]="CUPS_FONTPATH=/usr/share/cups/fonts"
D [27/Oct/2015:11:39:24 -0400] [Job 112] envp[5]="CUPS_REQUESTROOT=/private/var/spool/cups"
D [27/Oct/2015:11:39:24 -0400] [Job 112] envp[6]="CUPS_SERVERBIN=/usr/libexec/cups"
D [27/Oct/2015:11:39:24 -0400] [Job 112] envp[7]="CUPS_SERVERROOT=/private/etc/cups"
D [27/Oct/2015:11:39:24 -0400] [Job 112] envp[8]="CUPS_STATEDIR=/private/etc/cups"
D [27/Oct/2015:11:39:24 -0400] [Job 112] envp[9]="HOME=/private/var/spool/cups/tmp"
D [27/Oct/2015:11:39:24 -0400] [Job 112] envp[10]="PATH=/usr/libexec/cups/filter:/usr/bin:/usr/sbin:/bin:/usr/bin"
D [27/Oct/2015:11:39:24 -0400] [Job 112] envp[11]="SERVER_ADMIN=root@MacBookPro2013.local"
D [27/Oct/2015:11:39:24 -0400] [Job 112] envp[12]="SOFTWARE=CUPS/2.0.0"
D [27/Oct/2015:11:39:24 -0400] [Job 112] envp[13]="TMPDIR=/private/var/spool/cups/tmp"
D [27/Oct/2015:11:39:24 -0400] [Job 112] envp[14]="USER=root"
D [27/Oct/2015:11:39:24 -0400] [Job 112] envp[15]="CUPS_MAX_MESSAGE=2047"
D [27/Oct/2015:11:39:24 -0400] [Job 112] envp[16]="CUPS_SERVER=/private/var/run/cupsd"
D [27/Oct/2015:11:39:24 -0400] [Job 112] envp[17]="CUPS_ENCRYPTION=IfRequested"
D [27/Oct/2015:11:39:24 -0400] [Job 112] envp[18]="IPP_PORT=631"
D [27/Oct/2015:11:39:24 -0400] [Job 112] envp[19]="CHARSET=utf-8"
D [27/Oct/2015:11:39:24 -0400] [Job 112] envp[20]="LANG=en_US.UTF-8"
D [27/Oct/2015:11:39:24 -0400] [Job 112] envp[21]="APPLE_LANGUAGE=en-US"
D [27/Oct/2015:11:39:24 -0400] [Job 112] envp[22]="PPD=/private/etc/cups/ppd/EPSON_WF_3520_Series.ppd"
D [27/Oct/2015:11:39:24 -0400] [Job 112] envp[23]="RIP_MAX_CACHE=128m"
D [27/Oct/2015:11:39:24 -0400] [Job 112] envp[24]="CONTENT_TYPE=application/postscript"
D [27/Oct/2015:11:39:24 -0400] [Job 112] envp[25]="DEVICE_URI=file:/tmp/epson.out"
D [27/Oct/2015:11:39:24 -0400] [Job 112] envp[26]="PRINTER_INFO=EPSON WF-3520 Series (to file)"
D [27/Oct/2015:11:39:24 -0400] [Job 112] envp[27]="PRINTER_LOCATION="
D [27/Oct/2015:11:39:24 -0400] [Job 112] envp[28]="PRINTER=EPSON_WF_3520_Series"
D [27/Oct/2015:11:39:24 -0400] [Job 112] envp[29]="PRINTER_STATE_REASONS=none"
D [27/Oct/2015:11:39:24 -0400] [Job 112] envp[30]="CUPS_FILETYPE=document"
D [27/Oct/2015:11:39:24 -0400] [Job 112] envp[31]="FINAL_CONTENT_TYPE=image/urf"
D [27/Oct/2015:11:39:24 -0400] [Job 112] envp[32]="AUTH_I****"
I [27/Oct/2015:11:39:24 -0400] [Job 112] Started filter /usr/libexec/cups/filter/pstoappleps (PID 81749)
I [27/Oct/2015:11:39:24 -0400] [Job 112] Started filter /usr/libexec/cups/filter/pstocupsraster (PID 81750)

With this information from the log file, we know everything we need to know to re-create this process. The following commands will run the same commands that are executed automatically when the print button is used (after capturing the PostScript file that Acrobat created from the spool area):

#!/bin/bash
export PPD=/private/etc/cups/ppd/EPSON_WF_3520_Series.ppd
/usr/libexec/cups/filter/pstoappleps 106 khk sample.pdf 1 "AP_ColorMatchingMode=AP_ApplicationColorMatching AP_D_InputSlot= nocollate com.apple.print.DocumentTicket.PMSpoolFormat=application/pdf com.apple.print.JobInfo.PMJobName=sample.pdf com.apple.print.PrinterInfo.PMColorDeviceID..n.=18333 com.apple.print.PrintSettings.PMCopies..n.=1 com.apple.print.PrintSettings.PMCopyCollate..b. com.apple.print.PrintSettings.PMFirstPage..n.=1 com.apple.print.PrintSettings.PMLastPage..n.=2147483647 com.apple.print.PrintSettings.PMPageRange..a.0..n.=1 com.apple.print.PrintSettings.PMPageRange..a.1..n.=2147483647 media=Letter pserrorhandler-requested=standard job-uuid=urn:uuid:80d6bf80-1651-3095-51f5-185048379779 job-originating-host-name=localhost time-at-creation=1445884058 time-at-processing=1445884058 PageSize=Letter"  sample.ps  > sample.eps 
/usr/libexec/cups/filter/pstocupsraster  106 khk sample.pdf 1 "AP_ColorMatchingMode=AP_ApplicationColorMatching AP_D_InputSlot= nocollate com.apple.print.DocumentTicket.PMSpoolFormat=application/pdf com.apple.print.JobInfo.PMJobName=sample.pdf com.apple.print.PrinterInfo.PMColorDeviceID..n.=18333 com.apple.print.PrintSettings.PMCopies..n.=1 com.apple.print.PrintSettings.PMCopyCollate..b. com.apple.print.PrintSettings.PMFirstPage..n.=1 com.apple.print.PrintSettings.PMLastPage..n.=2147483647 com.apple.print.PrintSettings.PMPageRange..a.0..n.=1 com.apple.print.PrintSettings.PMPageRange..a.1..n.=2147483647 media=Letter pserrorhandler-requested=standard job-uuid=urn:uuid:80d6bf80-1651-3095-51f5-185048379779 job-originating-host-name=localhost time-at-creation=1445884058 time-at-processing=1445884058 PageSize=Letter"  sample.ps > sample.raster 
/usr/libexec/cups/filter/rastertourf  106 khk sample.pdf 1 "AP_ColorMatchingMode=AP_ApplicationColorMatching AP_D_InputSlot= nocollate com.apple.print.DocumentTicket.PMSpoolFormat=application/pdf com.apple.print.JobInfo.PMJobName=sample.pdf com.apple.print.PrinterInfo.PMColorDeviceID..n.=18333 com.apple.print.PrintSettings.PMCopies..n.=1 com.apple.print.PrintSettings.PMCopyCollate..b. com.apple.print.PrintSettings.PMFirstPage..n.=1 com.apple.print.PrintSettings.PMLastPage..n.=2147483647 com.apple.print.PrintSettings.PMPageRange..a.0..n.=1 com.apple.print.PrintSettings.PMPageRange..a.1..n.=2147483647 media=Letter pserrorhandler-requested=standard job-uuid=urn:uuid:80d6bf80-1651-3095-51f5-185048379779 job-originating-host-name=localhost time-at-creation=1445884058 time-at-processing=1445884058 PageSize=Letter"  sample.raster > sample.urf

So, what’s going on? We start out with a PostScript file and run it through pstoappleps, which seems to “normalize” the PostScript to something that Apple’s other utilities can work with. The next step is pstocupsraster, which is the actual PostScript interpreter that converts PostScript to the raster image, which is where the problem occurs. And the last step is rastertourf, which takes the raster image and wraps it into the URF format.

At the end of this script we end up with a URF file. In order to actually see what’s in the file, I convert that URF file to TIFF using the urftotiff utility from the urf_work project. We could also use Michael Sweet’s RasterView utility and look at the raster file before it gets converted to URF.

I can run this tool chain on many different PDF files without ever seeing the problem of missing characters, so what exactly triggers it? After analyzing a few files that end up with missing characters, it turns out that only text rendered with CID fonts is affected. At one point in time, it was pretty easy to create such files: Older versions of Adobe InDesign created PDF files with embedded CID fonts on a regular basis, and caused problems with non-Adobe RIPs in print workflows. Now it’s actually pretty complicated to end up with a CID font in a PDF file exported from InDesign. Interestingly enough, one of the test files I had access to was an InDesign file. I did however find a tool that always creates CID fonts in PDF files: wkhtmltopdf

I created a set of HTML files that I ran through wkhtmltopdf, and then merged in Adobe Acrobat into one PDF. Such a file, when printed to any printer on Mac OS that uses the tools mentioned above to convert PostScript to a raster format, will very likely show missing characters. My theory at this time is that when a certain CID font is subset embedded on multiple pages with different subsets, the Mac OS X PostScript to URF toolchain will not correctly interpret the subsets on each page – somehow it gets “stuck” with one subset, and if a page uses characters that are not represented in that subset, we end up with missing characters.

Here are the files that I’ve used: part1.html part2.html part3.html

Here are the individual PDF files and the merged file: part1.pdf part2.pdf part3.pdf merged.pdf

And finally, here is the PostScript file that Acrobat creates: sample.ps

Now that we know what causes this problem, is there anything we can do about it? Unfortunately, because most of the functionality is in Mac OS X proprietary files, we cannot fix the problem. All we can do is work around it by printing “as Image”, and wait for Apple to fix it on their end. I’ve tested this on both Mac OS X 10.10 (Yosemite) and 10.11 (El Capitan) with the same results.

Posted in Acrobat, Apple, PDF | Tagged , , , , | Leave a comment

Share Documents via Adobe’s Document Cloud

As many of you know, I am very active on the Adobe Acrobat User Community (http://www.acrobatusers.com). Oftentimes it’s necessary to actually see a PDF file in order to help somebody with a problem. There is no file sharing mechanism built into AcrobatUsers, which means that in order to share a file, it is necessary to use some other sharing service. One such option is Adobe’s own Document Cloud. The following shows how to upload a document to the Document Cloud, and to share it.

When you sign up for your Adobe ID, you get a Document Cloud account that comes with storage space. If you have a subscription to Acrobat DC, you get 20GB of storage, with a free account that is not connected to an Acrobat DC subscription, you get 5GB. This means you have 5GB of storage space available without paying a dime to Adobe.

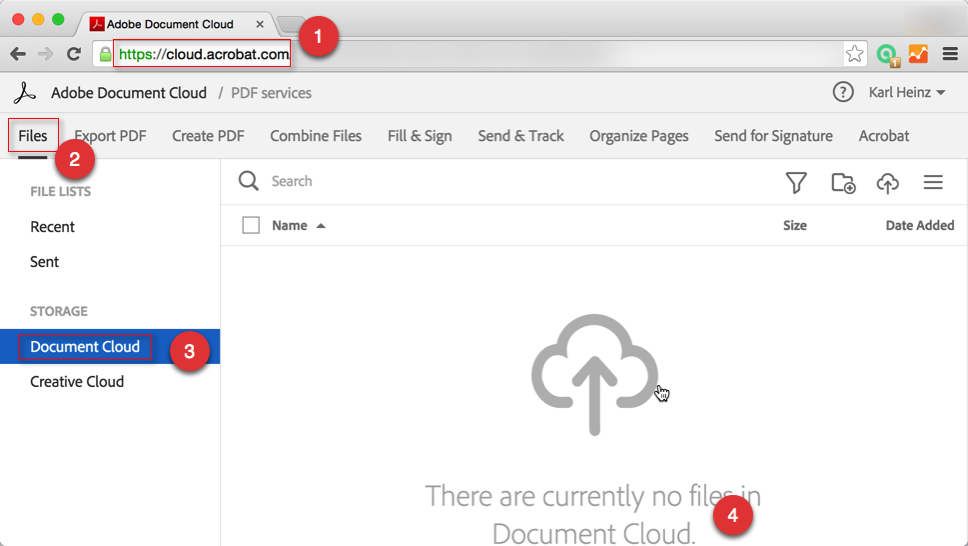
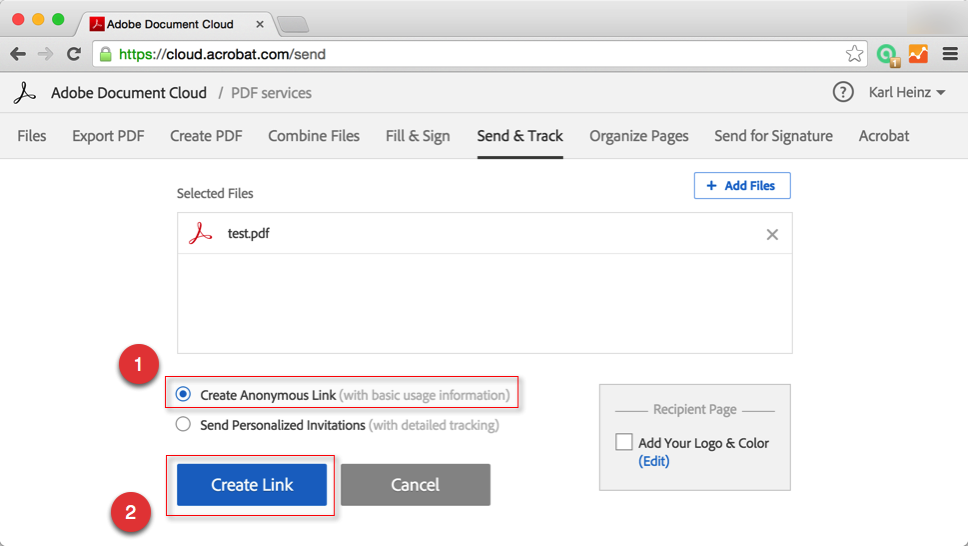
To share a file, log into the Document Cloud at http://cloud.acrobat.com (1):

2015 10 22 12 14 00

Once logged in, go to the “File” tab (2) and switch to the “Document Cloud” category (3). You can now upload a file (4) by e.g. dragging and dropping the file into the upload area.

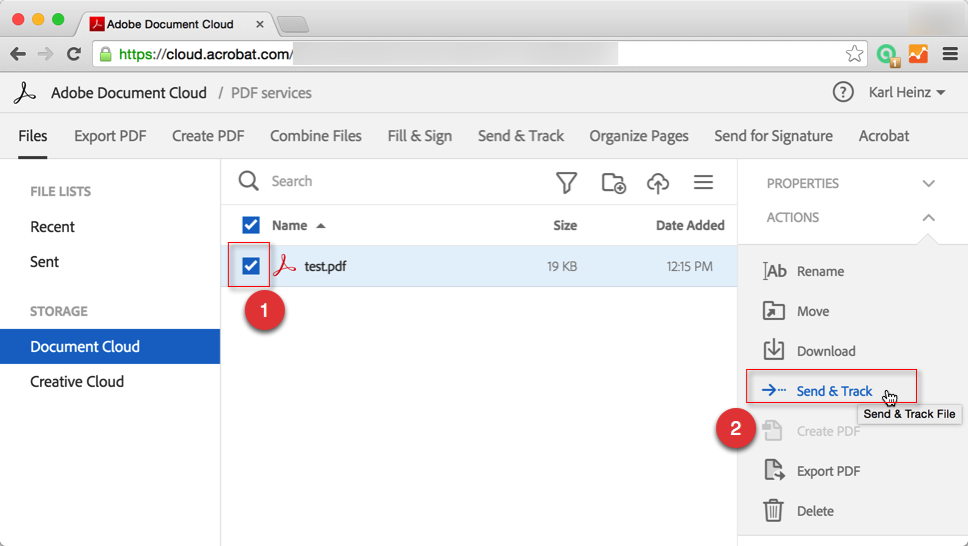
Once a file is uploaded, select that file (1):

2015 10 22 12 17 26

This will enable a panel on the right side that has (after scrolling a bit) the option to “Send & Track” (2). Sharing in the Document Cloud environment is called to send a file.

After selecting to send a file, you get the option to either share it via an anonymous link (with very limited tracking capabilities), or to send a personalized invitation with more detailed tracking. For now – because we want to share the link publicly – we select the anonymous link (1) and then click on the “Send” button (2).

2015 10 22 12 18 34

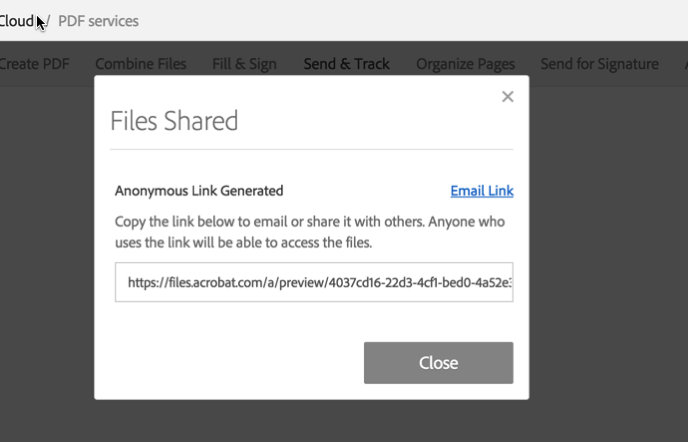
This will bring up a popup dialog with the link that allows people to access the file we just uploaded:

2015 10 22 17 24 27

If you want to share a document with an individual or a small group of people, select to send via the “Personalized Invitation”, but that requires a subscription – the cheapest one would be the “Send & Track” subscription for currently $19.99/year.

Posted in Acrobat, PDF, Tutorial | Tagged , , , | 2 Comments

Batch-Import Excel Data into PDF Forms

A while ago I documented for AcrobatUsers.com how to manually import an Excel data record into a PDF form. You can find this information here: Can I import data from an Excel spreadsheet to a fillable PDF Form?

This is very useful if you only have to deal with one or a few records that you need to import into PDF forms, but what if we are talking about 10s or 100s of records? It gets a bit boring to click on the same buttons again and again. There must be a way to automate this…

And, there is. The following gives you an idea about how to do this using JavaScript.

Anything I said about importing data manually in the link above is still true, so get familiar with the manual process and verify that you can actually import one data record from your text file into your PDF form. If that does not work, trying to automate this step will also fail.

The key to importing data from an Excel file is that you need to export the data as a “tab delimited text file” – just like described in the AcrobatUsers.com question I linked to above. Once you have such a file, you can use the Acrobat JavaScript method Doc.importTextData() to import one record at a time (just like we did manually before). Take a look at the documentation for this method: Doc.importTextData

There is a problem with this page from the documentation: The error codes use the wrong sign: All positive values are supposed to be negative and vice versa.

To import a whole spread sheet of data, we need to call this method for each record, and then save the file under a new name, an then move to the next record. This can be done e.g. in an Action. You can use the following script in an Action (or a custom command in Acrobat DC):

[Update: I’ve fixed the code below – I had some of the error codes mixed up.]

There are two lines that actually do something: The line that is marked with ‘imports the next record’ is the one line that reads the record with the index “idx” from the file with the fielname “fileName”. And, the line with “saves the file” will save the open file under a new filename. You can get creative and use elements from the form to craete your new filename.

The only thing that’s a bit complex is the file and directory names in this script: Acrobat’s JavaScript uses “device independent paths”. What I’ve used in this script are paths on a Mac, if you are running Windows, the paths may look like this:

var fileName = "/c/temp/data.txt";
var outputDir = "/c/temp/output/";

A path of e.g. “C:\temp” gets converted to “/c/temp”. You can read up on device independent paths in the PDF specification.

This should get you started. If you have questions, as usual, post them in the comments.

Posted in Acrobat, JavaScript, PDF, Tutorial | Tagged , , , , , , | 231 Comments