Document Level Scripts With Acrobat Standard

If you are using Adobe Acrobat Standard, you’ve probably noticed that you cannot add document level scripts to PDF documents. This is a limitation of the user interface, Acrobat Standard can actually add such scripts (and document actions), but it requires some JavaScript programming.

I’ve done that job for you. Download the script addDocumentScripts.js and save it on your local computer.

To install the script, use the information from my post “Acrobat JavaScripts – Where do they go”

Once the file is saved in either the application or the user level JavaScripts directory, you can open a PDF file and select the new menu item “File>Add JS Scripts”.

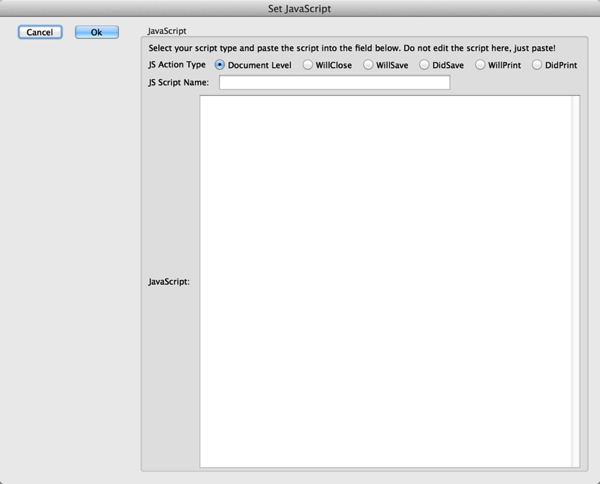
This will bring up the following dialog:

Add Document Scripts Dialog

First select what type of script you want to add (the default is “Document Level”):

  • Document Level Script
  • Document Action:
    • Will Close
    • Will Save
    • Did Save
    • Will Print
    • Did Print

The script name is only necessary for a document level script, the document actions do not require a name (there can only be one per type).

When you fill in the script, make sure you paste from your text editor: Edit the script in an editor and then just paste the final script, do not edit the script in this dialog. The reason for this is that you will not be able to retrieve the script with Acrobat Standard, only Acrobat Pro allows you to do that. This means that any changes you make to your script in the input field on this dialog will be lost – they will be saved in the document, but you will not be able to retrieve or to edit them.

This is not the most elegant way to add scripts to a document, but if all you have is Acrobat Standard, at least you can.

Posted in Acrobat, JavaScript, PDF | Tagged , , | 22 Comments

Where are my Adobe Acrobat 9 Updates???

Update: There is now a Knowledge Base article about updating older versions of Acrobat/Reader: http://helpx.adobe.com/acrobat/kb/update-patch-acrobat-reader-7.html

You may remember that Adobe “end of life’ed” Adobe Acrobat 9 more than a year ago. This does not mean that Acrobat 9 does not work anymore, it means that you will not get any security updates for new security threats.

When you install a new version of Acrobat, you always end up with a x.0.0 version (e.g. 9.0.0 for Acrobat 9), this means that you need to first upgrade your installation to the latest available version.

Up until recently, it was no problem to download all the old Acrobat 9 updates, but Adobe – because Acrobat 9 and older are no longer supported – removed those update links from its update web pages for Mac and Windows. The only update versions available are for Acrobat X and XI.

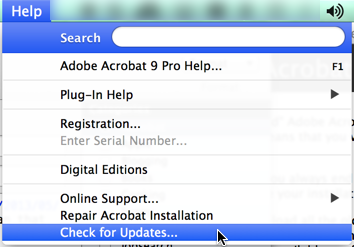
How does one update an Acrobat 9 version that needed to be re-installed? According to what I’ve heard from Adobe, it should still be possible to use the “Check for Updates” function in Acrobat’s Help menu, but the last time I’ve had to re-install Acrobat 9, that was not the case.

2014 08 11 17 07 27

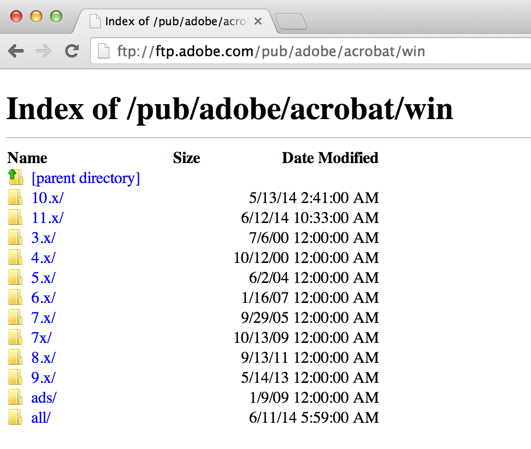
If you need to access updates for older (non-supported) versions of Adobe Acrobat, these are still available, but accessing them is a bit more complex now: Adobe has a FTP server that holds all old updates. The problem is that it does not have the release notes that go with these updates, this means that it may not be obvious which version of Acrobat is required for which update. We also don’t know what exactly was fixed in each update, but as long as we start out with a brand new Acrobat 9.0.0 system (e.g. installed from your original installation disk, or via the download page http://helpx.adobe.com/acrobat/kb/acrobat-8-9-product-downloads.html), and then install every available update in the correct order (e.g. 9.0.1 first, followed by 9.0.2 and so on), we will end up with a working system.

You can access these updates via these two links (one for the Mac, and one for Windows):

ftp://ftp.adobe.com/pub/adobe/acrobat/win
ftp://ftp.adobe.com/pub/adobe/acrobat/mac

2014 08 11 17 09 27

Your browser should be able to deal with FTP links, just like it does with HTML links. However, navigating the directory hierarchy is more like navigating a folder structure on your computer than selecting links on a web page.

You can also find updates for older versions of Acrobat on this FTP server.

Posted in Acrobat | 88 Comments

Convert Radio Button Groups to Checkbox Groups in PDF Forms

If you’ve worked with PDF forms, you are probably familiar with radio buttons:

Radiobutton

There is one problem with radio buttons: When you have a selection that also includes “non of the above”, you have to create a separate option for that: A radio button group – once selected – cannot be unselected.

Sometimes it would be useful to allow the user to unselect a radio button. This can be accomplished with a checkbox group:

Checkboxgroup

A checkbox group behaves just like a radio button group (e.g. only one option can be selected), but does allow you to have all options deselected by clicking on the currently selected item.

There is no automatic way to create these checkbox groups as for radio buttons, we have to manually apply the same name to all checkboxes that we want to be part of the group (on the “General” tab of the field properties), and then provide different export values for the different checkboxes in one group. This can be done on the “Options” tab of the field properties:

Options

The same tab also allows us to modify the style of the checkbox. To make it look more like a radio button, I usually select “Circle” as the check box style. As you can see from the screenshots above, the checkbox still has a square “box”, whereas a real radio button uses a round container, but the checkmark is now a black “dot” or circle, just like for a radio button.

If you’ve created a complex form with radio buttons, and your requirements for the form change late in the implementation phase, and all of a sudden you need to make sure that a radio button selection can be deselected, you will have to convert all radio button groups to checkbox groups.

This is may be a very cumbersome change for a complex form if done manually, but with the help of some JavaScript, we can make this change automatically with a few lines of JavaScript code.

If you run the following code in e.g. an Acrobat Action, all radio button groups will get converted to equivalent checkbox groups:

function processRB(f) {
	// try to get all the widgets
	var nWidgets = 0;
	var fields = [];
	while (true) {
		var w = this.getField(f.name + "." + nWidgets);
		if (w == null) break;
		// work with this widget:
		var w_info = {
			name: f.name,
			name2: w.name,
			rect: w.rect,
			style: w.style,
			display: w.display,
			page: w.page
		};
		fields.push(w_info);
		nWidgets++;
	}
	console.println("Found " + nWidgets + " widgets");
	var theExportValues = f.exportValues;
	var theName = f.name;
	var theStyle = f.style;
	var theDisplay = f.display;
	this.removeField(f.name);

	for (var rb in fields) {
		var fn = this.addField({
			cName: theName + "_CB",
			cFieldType: "checkbox",
			nPageNum: fields.page,
			oCoords: fields.rect
		});
	}
	var cb = this.getField(theName + "_CB");
	cb.exportValues = theExportValues;
	cb.style = theStyle;
	cb.display = theDisplay;
}


// iterate over all form fields and look for radio button groups
for (var i = 0; i < this.numFields; i++) {
	var f = this.getField(this.getNthFieldName(i));

	if (f.type == "radiobutton") {
		processRB(f);
	}
}

To “fine tune” this process, it would also be possible to run the conversion script only for radio buttons that have a certain name. You can do this by e.g. changing the loop in the last few lines to something like this:

// iterate over all form fields and look for radio button groups
for (var i = 0; i < this.numFields; i++) {
	var f = this.getField(this.getNthFieldName(i));

	if (f.type == "radiobutton") {
		var p = /RadioButtonGroup$/g;
		if (p.test(f.name)) {
			processRB(f);
		}
	}
}

This will only convert a group that is named “RadioButtonGroup”. You can come up with a more complex test for the name by using any method that JavaScript allows.

The same approach can also be used to change the type of other field types (e.g. change a number of text fields to drop down controls).

Posted in Acrobat, JavaScript, PDF, Tutorial | Tagged , , , , , | 40 Comments

Floating Text on PDF Documents

Have you ever thought that it would be nice to add some “floating text” to a PDF document that can be shown and hidden based on where the user’s mouse cursor is? This is useful, for example, if you want to provide some help for filling in a form field, or an explanation of a word on a page.

For the purpose of this post, let’s assume you want to explain one of more terms in your document with a popup dictionary entry when the user places the cursor over the word in question.

There are two different ways you can handle this. The good news here is that none of these require any JavaScript programming. Both do however require Adobe Acrobat, this cannot be done in the Adobe Reader, even though Reader can be used to display these documents without a problem.

Adding a Tooltip

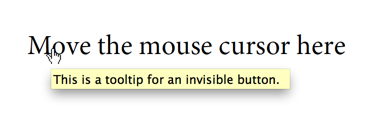
The first method is straight forward and only uses a button that does not have any function besides showing the tooltip that is associated with that button:

ToolTipText

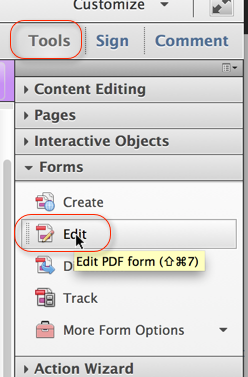
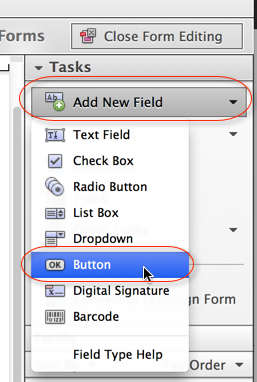
To accomplish this, open up the form editor (Tools>Forms>Edit) and then place a button on the document where you want to trigger the tooltip (e.g. around the word you want to explain).

FormEditMode

AddButton

Once the button is placed, double-click on the button on the document to bring up the full properties dialog for this form element (or right-click on the button and select “Properties” from the menu).

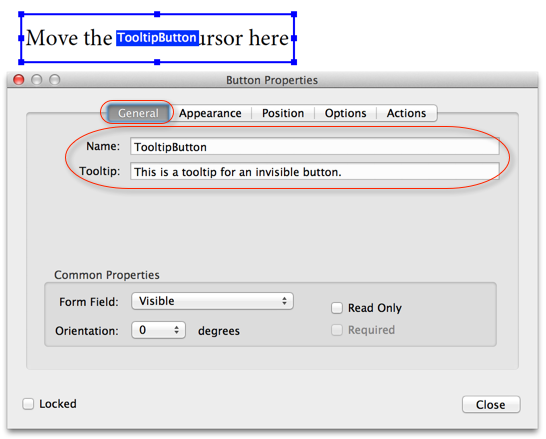
On the “General” tab provide a meaningful name (so that you can later recognize what this button is supposed to do), and add the tooltip you want to display:

TT General

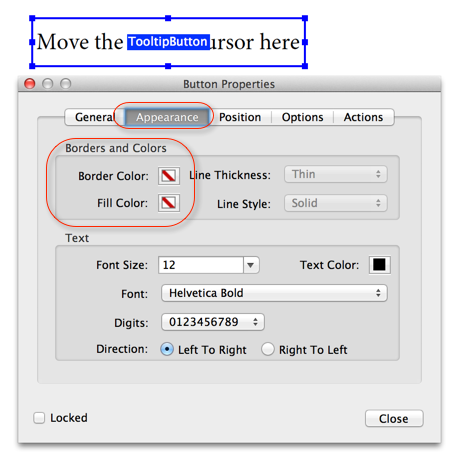
On the “Appearance” tab set both border and fill colors to transparent:

TT Appearance

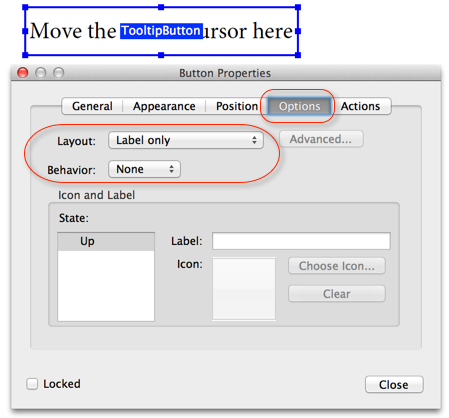
And, as the last step, go to the Options tab and set “Layout” to “Label only”, and “Behavior” to “None”:

TT Options

When you now exit form edit mode (or click on the Preview) button, you can move your mouse cursor over the (invisible to the user) button and after a second or two, you should see the tooltip being displayed.

This method does not give us much flexibility over the layout and the look of the “floating text”. By adding a text field that we can show and hide, we do have that control.

Show and Hide a Text Field

FloatingText

This method requires two fields: One text field that contains the text that should be shown when the mouse cursor is in a certain area, and a trigger field that is used to show and hide the text field.

To add a text field that we can show and hide, we start out just like with the tooltip method and we add a button – but this time without the tooltip text – to our document. In addition to the button, we also need to add a text field, which is done by picking the “Text Field” item form the “Add New Field” menu instead of the “Button” item.

Let’s first add the text to the floating text field and name it so that we can reference it.
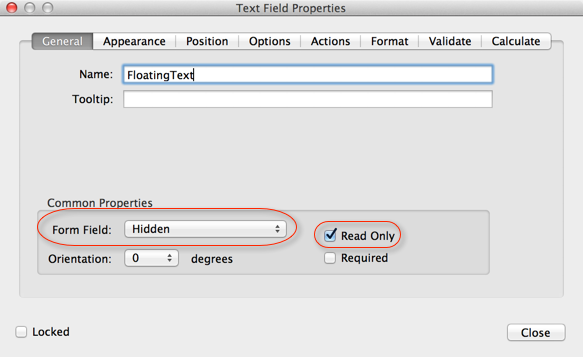
To bring up the full properties for the text field, double-click on the text field (or right-click and select Properties from the menu). On the “General” tab, provide a meaningful name (e.g. FloatingText or FloatingText_1 if you want to use more than just one instance). Also, make this field “Read-Only” and “Hidden”:

Float General

Then go to the “Options” tab and provide the help text you want to add in the “Default value” field.

Now bring up the properties for your trigger button. Give the button a meaningful name on the “General” tab (e.g. TriggerButton – if you want to add more than just one floating element, you may want to call it TriggerButton_1). This time we are not filling in the tooltip field.

On the Appearance tab we have to set both the Border and Fill colors to transparent, just like before. The same goes for the “Options” tab, we need to set the “Layout” to “Label only”, and the “Behavior” to “None.

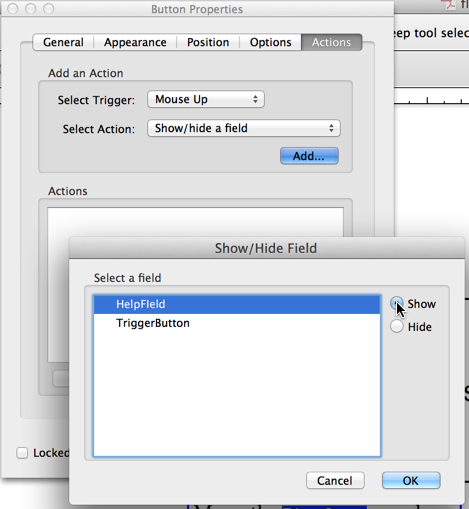
Here comes the important part – the section where we show and hide the floating text. Go to the Action tab and select to add a “Mouse Enter” action of “Show/Hide a field” and click on the “Add” button:

TT Actions

Now select your floating field by its name and select to “Show” it.

Repeat the same thing for a “Mouse Exit” event and “Hide” your floating field again.

That’s it. You can download my sample PDF file if you just want to see it work.

Once it’s working, you can of course modify the text, and adjust the font/fontsize/color/background color so that it fits your requirements.

Posted in Acrobat, PDF, Tutorial | Tagged , , , | 29 Comments

Embedding Fonts with Acrobat Pro’s Preflight Tool

Before we talk about how to embed fonts in a PDF file, let’s take a step back and get an idea about how fonts can be used in a PDF file. There are three different methods:

  • A PDF file can rely on the correct font being available on the target computer or printer. In this case, the PDF document will only contain a reference to a font, and if that font is not available, it will either be substituted or the PDF document cannot be processed. How exactly this situation gets handled depends on what software you are using to process the PDF file, and if it’s a viewer, or a PDF printer.
  • A PDF file can have the font embedded in the file. This means, the font “travels” with the PDF file and is always available when the file is being displayed or printer. The drawback of this approach is that some fonts are huge (e.g. fonts for Asian languages), that would expand the file size dramatically. Also, in the case where you only need a few characters that are set in a certain font, the whole font would have to be embedded.
  • A font can be subset-embedded. This is very similar to an embedded font, but in this case, only those “glyphs” (these are the “drawings” of a character that appear in your PDF viewer, or on a printed page) that are actually used in the file (or on a certain page) are embedded. Let’s say you have a book titled “SOS” – the title is set in a font that is not used anywhere else in the book. In this case, you can embed only the glyphs for “S” and “O” and you can render this title. There is no need to embed any other glyphs, so you end up with the smalls possible PDF file.

Given this list of different options, it should be clear that the subset embedding method is the best way to use a font in a PDF document: The font will always be there when needed, but we are also not wasting any space by adding the complete font when we don’t need it.

The question that usually comes up at this point is “That all sounds very good, but doesn’t subset embedding mean that I cannot edit this document with the TouchUp Text tool (or the “Edit Text & Images tool in Acrobat XI) if the whole font is not embedded? If I only have ‘S’ and ‘O’ embedded, but I need to change the title to “S.O.S.”, I would not have access to the period.”

Acrobat actually requires that the font for text that you edit in Acrobat is available as a system font. It is not sufficient to have the font embedded in the document, it needs to be installed on the computer. Otherwise you cannot edit the text set it that font. This is done to comply with font licenses: You can only use the font (and editing a document would require you to use the font) if you have a license for the font. If the only copy of the font you have is the copy that is embedded in the PDF document, you do not have a licensed to use the font. The font foundry licensed the font to the author of the document with the right to embed it in the document so that you (without a valid license) can still view and print the document, but you cannot modify the document.

This means, that we need to make sure that a font is at least subset embedded when we create and distribute PDF documents, otherwise somebody who does not have that particular font will not be able to view or print the document the way the author created it.

Now back to how we would subset-embed the fonts using Acrobat’s Preflight tool. This preflight tool is only available in Acrobat Pro, not in Acrobat Standard and of course not in the free Adobe Reader.

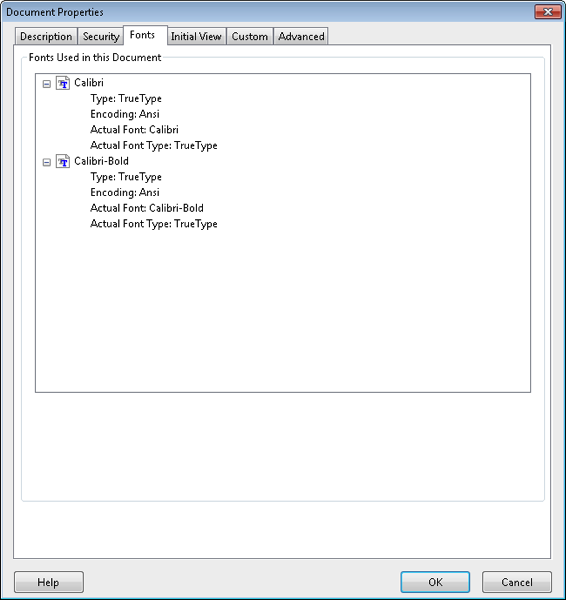
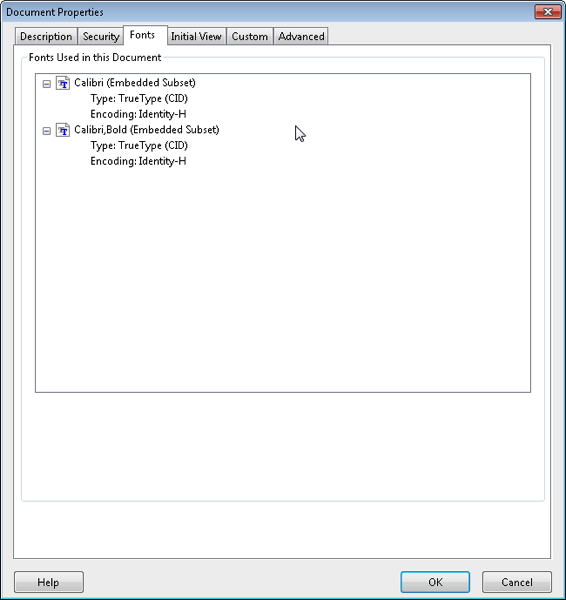
Let’s assume that the document that we want to process is already open in Acrobat XI Pro. Let’s verify that the fonts are not embedded by bringing up the Document Properties (Ctrl-D or Cmd-D), then bring up the “Fonts” tab:

2014 06 09 14 29 17

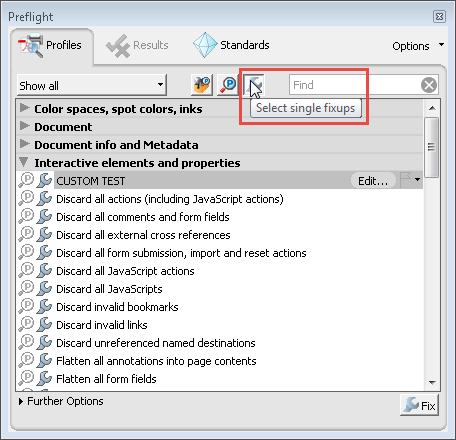
To bring up the Preflight tool, we have to options: On a Mac, we can select “Edit>Preflight” from the menu, or we can launch the tool from the “Print Production” panel in the Tools pane (this works for both Windows and the Mac, for the latter, only when a document is open). Once the Preflight tool is open, we select “Single Fixups” as indicated in this screenshot:

2014 06 09 14 45 35

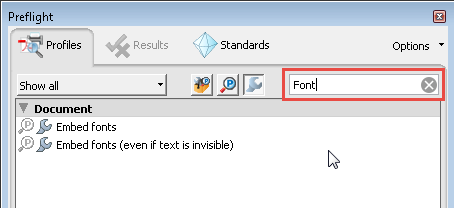
To find all “Font” related mixups, we can just type “Font” into the “Find” field:

2014 06 09 14 47 51

This will show all available mixups that contain the string “Font”. Acrobat’s default configuration contains two different mixups:

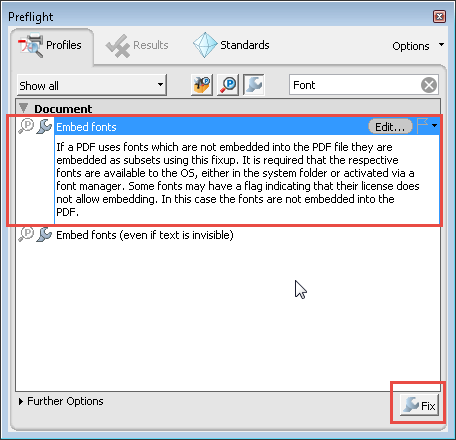
  • Embed Fonts
  • Embed Fonts (even if text is invisible)

In most cases, we are not dealign with invisible text, so just embedding fonts for text that is usually what we want. When you select on this item, we can run the Preflight fixup by clicking on the “Fix” button:

2014 06 09 14 51 12

Acrobat will then ask for a new filename to save the new file (that now will contain the embedded fonts) as. To verify that the fonts are actually embedded, you may have to close the file and re-open it before you bring up the document properties again:

2014 06 09 14 56 37

When you now distribute the file with the embedded fonts, the file should work on any computer, regardless of the fonts that are available on that computer.

Posted in Acrobat, PDF, Tutorial | Tagged , , , , | 18 Comments

Page Splitter Redux

One of my more popular blog posts was about splitting PDF pages. I wrote that post five years ago and I am still getting regular feedback and questions.

The original script was written for Acrobat 9, and used the “Documents” menu for it’s menu item. Since then, the Acrobat user interface was changed considerably, and there is no longer a “Documents” menu. It’s not too complicated to move the menu to the “Edit” menu, but most of my readers don’t have JavaScript programming experience, and source code does look a bit intimidating if you don’t work with it every day.

In Acrobat X and XI we also have a different method of running the script: We can create an Action using the Action Wizard that takes one or more documents and creates new documents with the split pages. The biggest advantage an Action has is that you can install it by just double-clicking on the SEQU file. The biggest disadvantage of an Action is that it only works for Adobe Acrobat Pro – the Standard version does not support Actions.

So, let’s take a second look at the page splitter script and make it easier to install for users of Adobe Acrobat X or XI.

If you have Adobe Acrobat Pro, then use the following links to download the Action file. It will have a .sequ file extension, and when you double-click it, it should ask you if you want to install it in Acrobat.

You can install and run the Acrobat X Action in Acrobat XI, but you will not be able to edit it. The actions will automatically split one or more documents and will save the document with a “-split” added to the original filename in the same directory that the original document is stored in. So, if you have a document named scan.pdf, you will get a new file that is called scan-spit.pdf in the same directory that scan.pdf is stored in. For Acrobat XI Pro users, installing the Action is the easiest way to get access to this functionality.

If you are interested in the updated folder level script, you can download it from here: splitpages.js

This file needs to be installed in one of the two Acrobat JavaScripts directories on your system. See my previous blog post about where folder level JavaScripts have to be stored for more information.

To make things easier, try to install the script in the application level JavaScripts directory. This directory should always be there, whereas the user directory may have to be created by you. Let’s assume you are installing the script in Acrobat XI, the JavaScripts directory should exist in one of these two locations on a Windows system:

C:\Program Files\Adobe\Acrobat 11.0\Acrobat\Javascripts


C:\Program Files (x86)\Adobe\Acrobat 11.0\Acrobat\Javascripts

On a Mac, the corresponding directory would be (this is a long path, so you will have to scroll):

/Applications/Adobe Acrobat XI Pro/Adobe Acrobat Pro.app/Contents/Resources/JavaScripts

If you are running Acrobat on Windows, and you don’t want to deal with figuring out where to install the scripts, you can use an installer I’ve created – all it does is trying to figure out where Acrobat’s JavaScript directory is, and install the script. Download the installer from here. If you have multiple versions of Acrobat installed, the script will only be installed in one version.

After this script is installed, and you restart Acrobat, you should find a new menu item at the bottom of the “Edit” menu in Acrobat. Differently from the Action, the “Split Pages” function will create a new document, but will not save it. It’s the user’s responsibility to save this file.

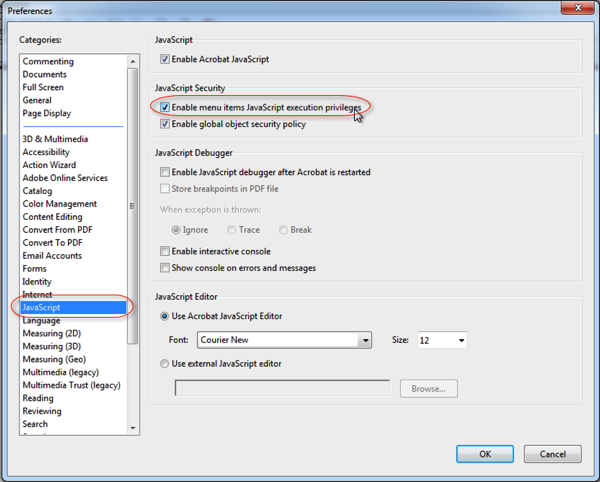
In order to get this folder level script to run, you need to change one setting in Acrobat’s Preferences: Bring up the Preferences dialog, then go go the JavaScript category:

2014 04 28 12 36 05

Now enable the settings “Enable menu items JavaScript execution privileges”. Without this setting, you will get an internal error when trying to run the function.

Posted in Acrobat, JavaScript, PDF | Tagged , , , | 71 Comments

Extract PDF Pages Based on Content

How would we identify pages in a PDF document that contain a certain word and extract those pages into a new document? This can be done with a few lines of JavaScript – there are different ways to do this: We can create a document level JavaScript and install it in the one of Acrobat’s JavaScript folders (see here for more information about how to identify the folder where to install such a script), or we can create an Action that executes the JavaScript. In the past I’ve written about how to create folder level scripts (e.g. here), so let’s create an Action today.

Here is the script that we will be using:

// Iterates over all pages and find a given string and extracts all 
// pages on which that string is found to a new file.

var pageArray = [];

var stringToSearchFor = "Total";

for (var p = 0; p < this.numPages; p++) {
	// iterate over all words
	for (var n = 0; n < this.getPageNumWords(p); n++) {
		if (this.getPageNthWord(p, n) == stringToSearchFor) {
			pageArray.push(p);
			break;
		}
	}
}

if (pageArray.length > 0) {
	// extract all pages that contain the string into a new document
	var d = app.newDoc();    // this will add a blank page - we need to remove that once we are done
	for (var n = 0; n < pageArray.length; n++) {
		d.insertPages( {
			nPage: d.numPages-1,
			cPath: this.path,
			nStart: pageArray[n],
			nEnd: pageArray[n],
		} );
	}

    // remove the first page
    d.deletePages(0);
    
}

The script is pretty straight forward: We are iterating over all pages, and on each page, we are looping over all words until we find the word that we are looking for. In that case, we are adding the page number to an array of page numbers.

If, after all this looping, we have information in this array of page numbers, we process that list by creating a new document (which will add a blank page – a PDF document always has to have at least one page), and then we add each page from the original document that we find in the array. All that’s left now is to remove that initial blank page.

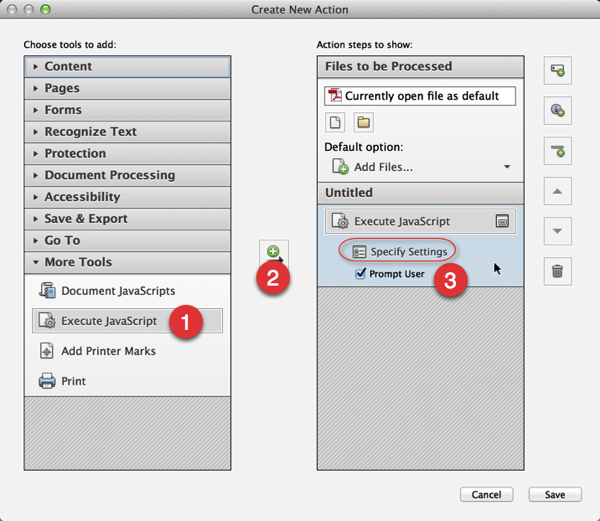
So, let’s convert this into an Action. In Acrobat XI Pro (this will not work in Standard, it does not support Actions), select “Tools>Action Wizard>Create New Action”. This will create an empty action. Do add JavaScript to our Action, select the “Execute JavaScript” option under “More Tools” and move it to the right side (e.g. by clicking on the arrow button.

2014 04 25 12 50 51

Once the “Execute JavaScript” step is on the right side, click on the “Specify Settings” button and paste the script from above into the editor. Once the script is part of the Action, you can prevent the editor from popping up every time you run the Action by deselecting “Prompt User” for this action step.

Save the action, give it a meaningful name and you are ready to execute it.

You can download the action here: ExtractPagesWithString.sequ. Once downloaded, just double-click on it to install it in Acrobat Pro. Again, this will not work with Acrobat Standard or the free Adobe Reader.

Posted in Acrobat, JavaScript, PDF, Tutorial | Tagged , , , | 122 Comments

PDF Navigation Buttons to Return to First Page

Can you create a PDF navigation button on each page of your document that brings you back to the first page without a single line of JavaScript?

Yes, and here is how:

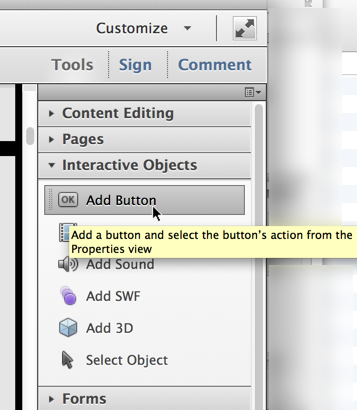
Load your document and go to the second page of your document – we are using the second page because it does not make much sense to have a button on the first page that brings you back to the first page – and place a button wherever you want that button to appear on your page. To place a button, select Tools>Interactive Objects>Add Button.

2014 03 25 12 48 59

Now just move the mouse cursor over to the page and draw a rectangle where you want the button to be, in the size you want the button to be.

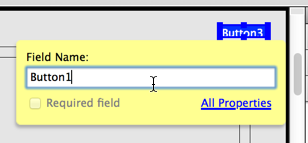
Once the button is created, you will be able to change it’s name, and to access the full properties for this button:

2014 03 25 12 43 54

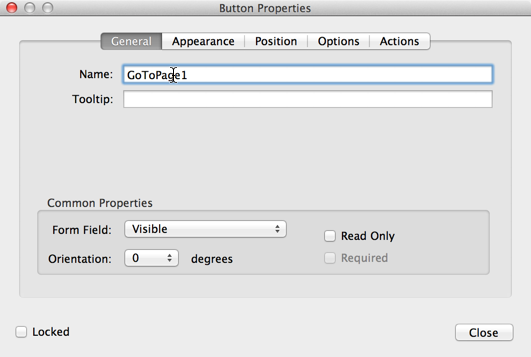
Click on the “All Properties” link on the yellow pop-up. We will change the name on the full properties dialog. This will bring up the properties dialog for this button.

2014 03 25 12 44 11

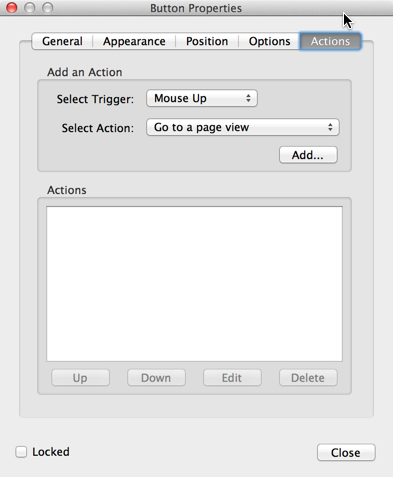
On this dialog, select the “General” tab and change the name. After that, select the “Actions” tab.

2014 03 25 12 44 35

What we have to do on this tab is a bit more complicated. First, make sure that “Select Trigger” is set to “Mouse Up”. We want this function to be executed when the user releases the mouse button on this field. We select “Go to a page view” as the action to perform when the trigger (mouse up) occurs.

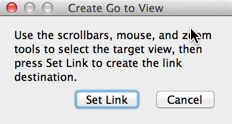
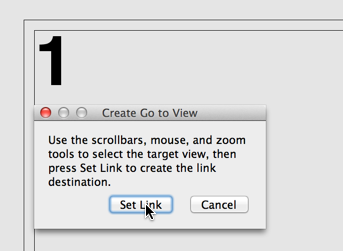
Now we click on the “Add” button to actually add this action to our navigation button. This will bring up a pop-up window with further instructions:

2014 03 25 12 44 49

After we navigate back to the first page (we are still on the second page of the document), we can click on the “Set Link” button to configure the page view we want this button to go to. This link is set to a “Page View”, not just a page number. This means that the zoom level, and which portion of the page gets displayed is also part of the “Page View”, so make sure that you see exactly what your users should see after they click on the navigation button.

2014 03 25 12 45 00

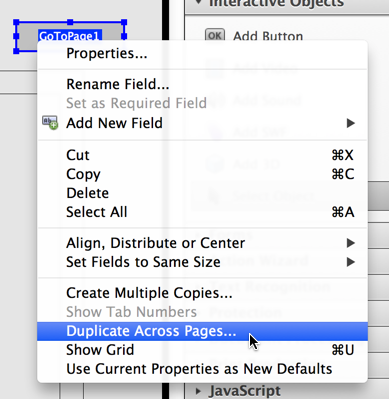
We now have one button that will bring us back to the first page. We can of course repeat these steps for every page in our document, but there is an easier way to accomplish this. Go back to the second page, where our navigation button is. The button should still have the blue outline with the resize handles, if that is not the case, select Tools>Interactive Objects>Select Object and click on the button. Right-click on the button to bring up a menu:

2014 03 25 12 45 34

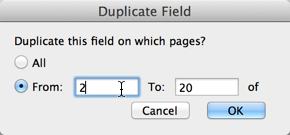
From this menu select “Duplicate Across Pages…”. This will bring up a dialog that allows us to select which pages this button should be duplicated on. We don’t need the button on the first page, so we cannot select “All”. Instead, we select from page 2 to the last page in the document (which happens to be 20 in my sample document).

2014 03 25 12 45 51

After clicking on “OK”, all pages, starting with the second page, will have this navigation button in the same location, and with the same functionality.

Posted in Acrobat, PDF, Tutorial | Tagged , , , , , | 24 Comments

Creating a PDF Stamp File from Scratch

In my last post I wrote about how to modify existing dynamic PDF stamps in Adobe Acrobat. This time, I’d like to demonstrate how a “normal” PDF file containing different stamp images can be converted to a PDF stamp file without having to go through the process of using Acrobat’s stamp creation tools.

Let’s assume we have five Adobe Illustrator files that we’ve saved as PDF files. In order to convert these individual files into one PDF file, we use Acrobat’s “Combine Files” feature. If the source files are of a different file format (e.g. PNG or JPEG), this process will work as well.
2014 03 14 11 22 55

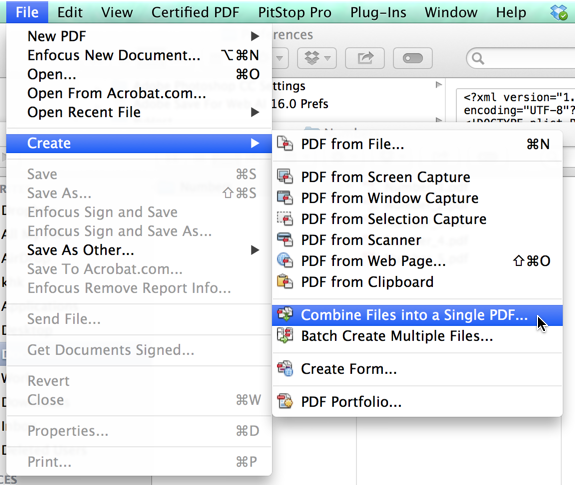
We select “File>Create>Combine File into a Single PDF…” from Acrobat’s menu. On the new dialog that opens, we click on the button in the upper left corner and select “Add Folder…” because all of our files are stored in a single folder (we could also opt for Add Files, and then add files from different locations to our document).
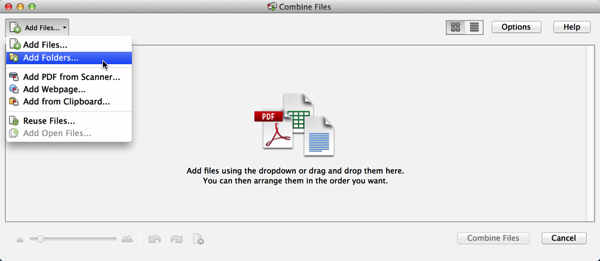
2014 03 14 11 23 21

After all files/folders are selected, we can bring the files into the correct order in which we want them to appear in the final PDF document – or our final PDF stamp file.

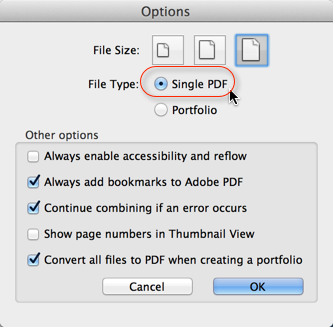
Make sure to click on the “Options” button and verify that “Single PDF” is selected. The other option that is possible is “Portfolio”, which does not work for stamp files.
2014 03 14 11 24 58

Combine the files and save the result under a meaningful name (the default is Binder1.pdf). Now we are ready to make the modifications necessary to convert this PDF file into a PDF stamp file.

The first thing we need to do with the combined document is to specify the stamp category that all stamps in this file will appear in when the stamp function is selected. When you activate the stamp tool, you will see different categories (e.g. “Dynamic”, “Standard Business”, or “Sign Here”), all of the stamps from one file will be part of the same category. We can specify that category by applying a document title in the document properties dialog. To bring up this dialog, use either Ctrl-D, Cmd-D or File>Properties. Then go to the “Description” tab and specify a document title. The title will be used as the stamp category.
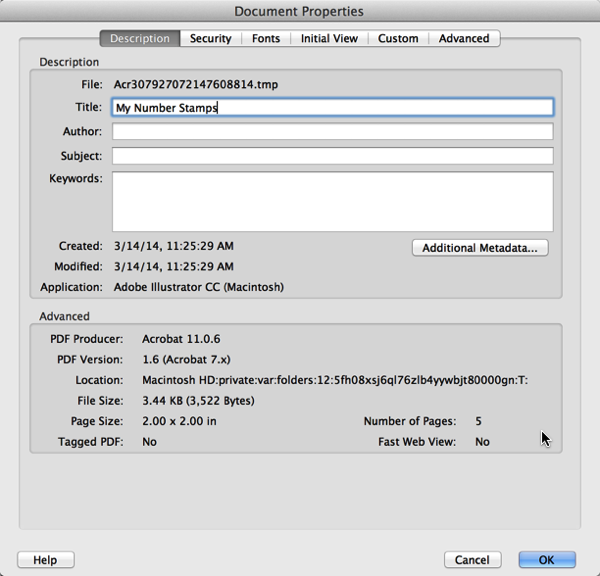
2014 03 14 11 26 07

Now that we have a category, we need to add the individual pages as named stamps to this category. Every stamp needs to be defined as a page template – this will provide the name for the stamp.

Page templates are usually used in PDF forms, and allow the user to create – or spawn – multiple copies of “page templates”. For a stamp file, Adobe decided to use the page template feature to identify a stamp in a PDF file.

You can find the page template functionality under the “Document Processing” heading in Tools. If you don’t see Tools on the right side of the Acrobat user interface next to Comment and Sign, it is possible that you a are not displaying the default tools, so click on the Customize button and switch to the Default Tools.
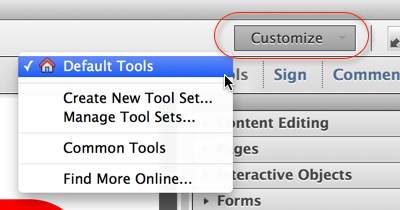
2014 03 14 11 28 08

Make sure that the first page of the document is displayed in Acrobat, then expand “Document Processing” and click on “Page Templates”.
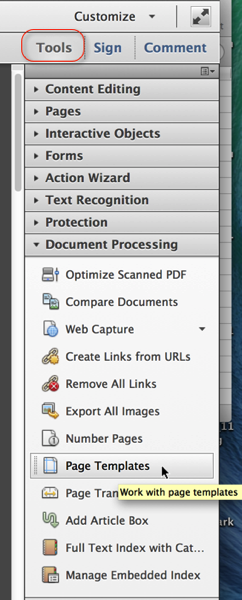
2014 03 14 11 27 23

This will bring up a new dialog, in which you can convert the current page to a page template.

The name of the page template needs to follow a certain pattern in order to make the name show up correctly under the stamp category. It needs to be in the form of


#InternalStampName=Stamp Display Name

The internal stamp name needs to be unique on your system. To name the page template, just type e.g. the following into the name field:


#Stamp_MyStampNumber1=Number 1

Then click on the “Add” button. Acrobat will verify that you want to convert the current page to a page template.
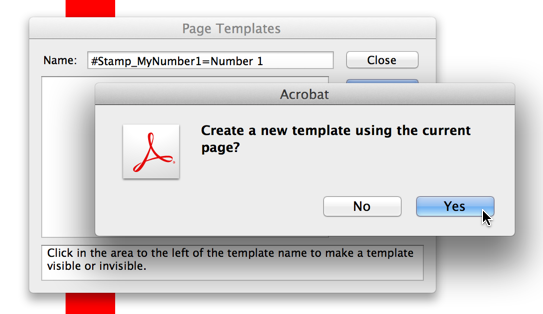
2014 03 14 11 41 25

Unfortunately, you have to close the dialog now in order to move to the second page – we cannot define all page templates in one step. Select the next page in the document, bring up the template dialog again and assign a name. Continue to do this for all pages in your document that you want to convert to stamps.
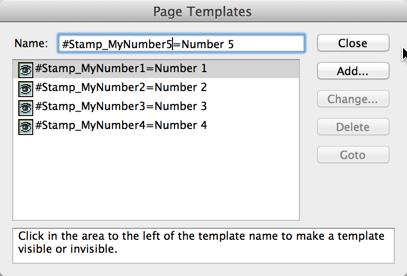
2014 03 14 11 43 02

Once you are done with this, save the document and move the new stamp file to Acrobat’s stamp directory. Where that is depends on the operating system, on if you want to install the stamp for every user on the system, and on the version of Acrobat you have.

For Acrobat XI Pro on a Mac, you can install the stamp file for just yourself by saving it to the following directory relative to your home directory:


~/Library/Application Support/Adobe/Acrobat/11.0/Stamps

The corresponding directory for a 64bit Windows 7 installation would be


C:\Users\\AppData\Roaming\Adobe\Acrobat\11.0\Stamps

Once the file is installed, and Acrobat is restarted, you should be able to see the new stamps in the stamp hierarchy:
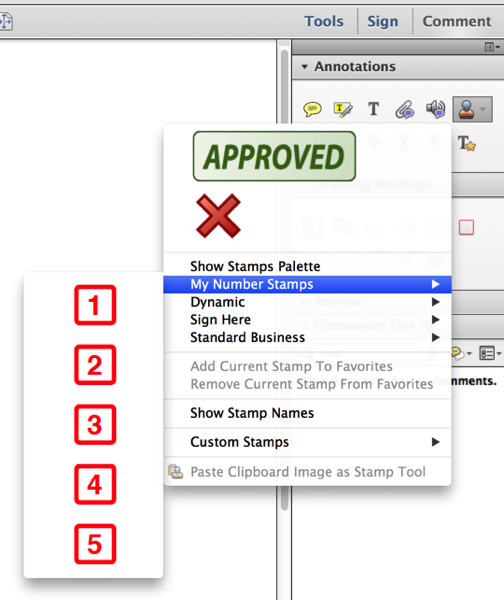
2014 03 14 11 48 29

If you have a lot of stamps you need to create, it will be much faster to create a simple JavaScript that will convert all pages in your document to page templates using the Doc.createTemplate() function (see http://livedocs.adobe.com/acrobat_sdk/11/Acrobat11_HTMLHelp/JS_API_AcroJS.89.457.html for more information). If you need help with creating such a script, feel free to get in touch with me to use my consulting services.
Posted in Acrobat, PDF, Tutorial | Tagged , , , | 1 Comment

Modify Dynamic PDF Stamps in Acrobat

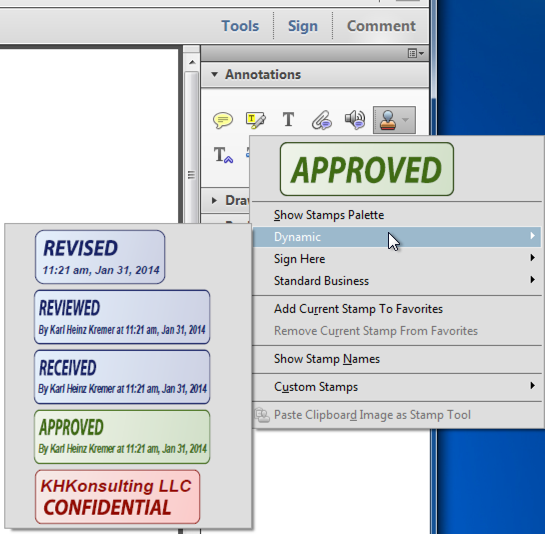
Adobe Acrobat comes with a number of dynamic PDF stamps. You can select them by going to the Comment pane on the right side, then click on the Stamp tool to bring up the list of stamps. All the factory default dynamic stamps are in the “Dynamic” category:

2014 01 31 11 22 03

What if we need a dynamic stamp that is not in the list? Let’s assume we need a stamp that is very similar to the “Received” stamp, but instead of the term “RECEIVED”, it should say “PREPARED”… The rest of this blog post will explain how you can take an existing dynamic stamp, copy it and modify it so that it fits your workflow.

First, we need to find out where these stamps are located. The good news here is that Acrobat can actually tell us by using one line of JavaScript. Take a look at my post titled “Acrobat JavaScripts – Where do they go?” to learn about the App.getPath() command. To get the location of the application level stamps, we would use the following JavaScript command in the JavaScript console:

app.getPath("app", "stamps");

On a Windows system we would either get C:\Program Files (x86)\Adobe\Acrobat 11.0\Acrobat\plug_ins\Annotations\Stamps or C:\Program Files\Adobe\Acrobat 11.0\Acrobat\plug_ins\Annotations\Stamps – depending on if we are running on a 32bit or 64bit version of the operating system. On a Mac, Acrobat would report /Applications/Adobe Acrobat XI Pro/Adobe Acrobat Pro.app/Contents/Built-in/Comments.acroplugin/Stamps/.

When we look in these directories, we would find sub-directories (one or more, depending on the type of Acrobat installation) for different languages. For English, we would use the ENU directory.

In this directory are all the stamp files that Acrobat comes with. The one we are interested in is the file Dynamic.pdf. When we open this in Acrobat, we can see that there is one page per stamp. To duplicate e.g. the Received stamp, we can use the technique I described in my blog post “Duplicate a Page in Adobe Acrobat”. Once you have a second copy of this stamp in your document, make sure that you work with the copy and not the original stamp.

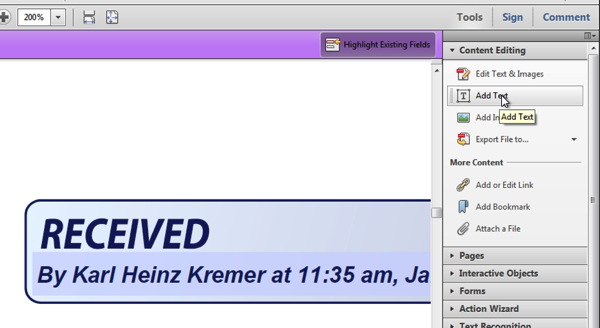
When we go to the page that contains our copy of the Received stamp, we can modify it.Let’s start this by adding the new text just above the current stamp. To do that, we need to use the Tools>Content Editing>Add Text function.

2014 01 31 11 50 47

Now we can click on the blank space above the stamp and start to type “Prepared”. To match the color and the font, select the just typed text and change the font to Arial, Arial Unicode MS or Helvetica, click on the Bold and Italics button, set the font size to 20 and adjust the color by clicking on the black box to the right of the font size. I measured the color in Illustrator, and it’s R=24, G=37 and B=100.

2014 01 31 11 52 39

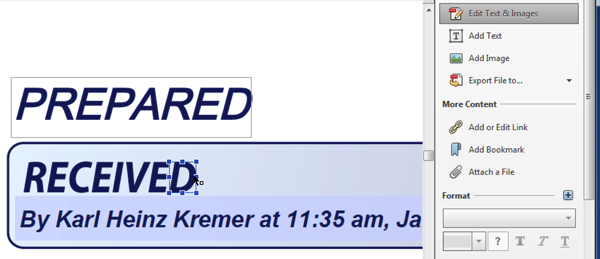
Now that we have our new text, it’s time to remove the old text. Unfortunately, we don’t have “real” text for the “RECEIVED” string, every character is its own path, and we need to remove the text character by character. To do that, select the “Edit Text & Images” tool and click on e.g. the “D”. Now you can delete this character by using the Delete key (or fn-Delete on a Mac).2014 01 31 11 53 37

Do this for all characters in “RECEIVED”:

2014 01 31 11 54 32

To move the new text, we still use the “Edit Text & Images” tool. Select the text again, and move the cursor over the outline of the text until you see the “Move” cursor:

2014 01 31 11 55 05

Now click and move the text to its correct position:

2014 01 31 11 55 40

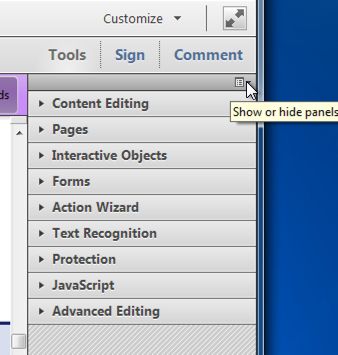
At this point, the new stamp image is correct. All we need to do know is to “tell” Acrobat that this is a stamp, and by what name it should be referred to. This is done in the “Page Templates” tool. Select Tools>Document Processing>Page Templates to activate it. If “Document Processing” is not in the Tools pane, you need to click on the little “Show or hide panels” menu icon at the top of the pane and enable it.

2014 01 31 11 56 15

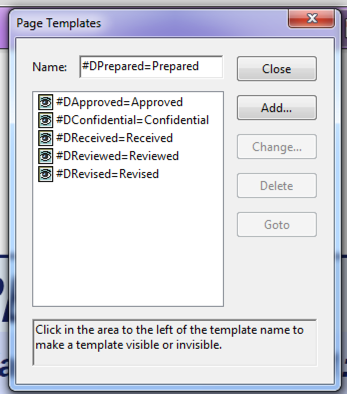
Activating the Page Templates tool will display the Page Templates dialog. Before you do that, make sure that our new stamp is still the active page in Acrobat. Enter the following string in the “Name” field: #DPrepared=Prepared and click on the “Add” button. Acknowledge that you want to convert your active page to a template, and close the dialog.

2014 01 31 11 57 23

At this point you can save the updated stamp file. Depending on which operating system you are on, saving back to the original file will just work, or you will have to save to a temporary location (e.g. your Desktop), then quit Acrobat and move the file to its correct location.

The new stamp is now ready to be used, all you need to do is restart Acrobat so that it re-reads the stamp files.

Posted in Acrobat, PDF, Tutorial | Tagged , , , , | 133 Comments