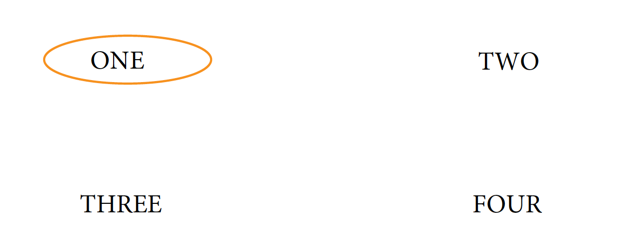
I assume you’ve filled out a paper form with a pen, and circled one or more of the options presented on the form. Can this be done in a PDF form as well?

To create such a form, we cannot just use the standard PDF form field types, we need to be a bit more inventive. A while ago, I answered a question to do just that with two options (“Yes” and “No”) on the now read-only AcrobatUsers.com: https://answers.acrobatusers.com/Circle-PDF-clicking-it-q290981.aspx
For a scenario where more than two buttons need to be part of such a group, or for a more flexible approach, I modified the script presented in the AcrobatUsers.com post.
Here are the steps to a complete solution:
Create a PDF file containing just the “circle” (or the oval) you want to use to circle the options in your form. You can do this in e.g. Adobe Illustrator or Adobe Photoshop. Make sure that the inside of the circle/oval is transparent, otherwise you will not see the selected option “through” the circle.
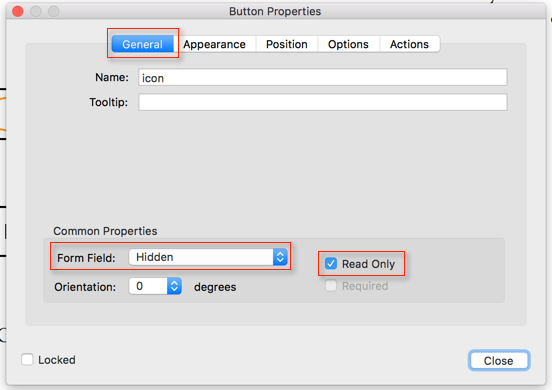
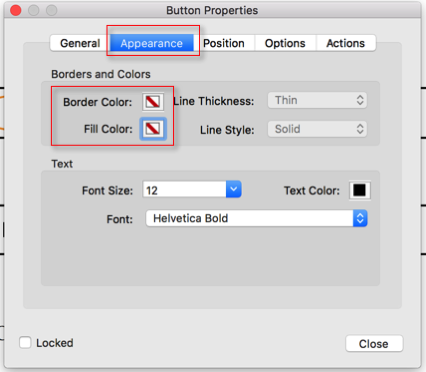
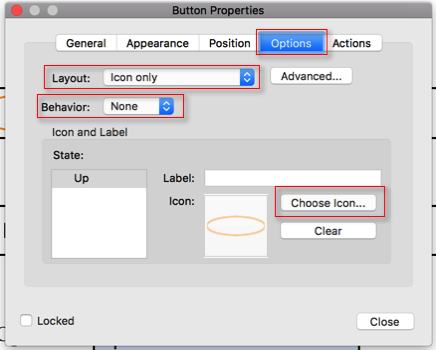
Create your form with all the options you want to be circled as part of the form “background”. Then create one button field that uses the circle/oval image from above as it’s button icon. This button will not be used to interact with the user, it’s purpose is to store the button icon (the circle/oval), and it will eventually be read-only and hidden, so place it anywhere on the form where it does not interfere with other buttons you want to place. Now bring up the properties dialog for this new button. The selections on the properties dialog that need to be changed are outlined here:
On the “General” tab select to make this button read-only and hidden. Again, we are only using this first button to store the icon image, so there is no need to show this button to the user, or let the user interact with it. I am calling this button “icon”, if you select to change the button name, keep in mind that the same name needs to be used in the button action script below.

On the “Appearance” tab set both the border color and the background color to “transparent”. This setting also needs to be applied to the other buttons we will add to this form.

On the “Options” tab select to use an “icon only” layout, and set the “Behavior” to “None”, then select the PDF document that contains your circle/oval icon from above.

Now add the other buttons to your document that we will use to select options on the form. For now, I am only considereing one group of buttons called “Button1” – the individual buttons in the group will have names like “Button1.Opt1”, “Button1.Opt2” and so on. You can use any descriptive name for the last part of the button name, as long as it does not contain a period.
Setup these buttons with transparent border and background color as described above. Now use the following script as the “Mouse Up” action script on the buttons’ “Action” tab:
var baseName;
var currentState;

// get our name
var theName = event.target.name;

var re = /(.*)\.(.*)/;

var ar = re.exec(theName);

if (ar.length > 0) {
    baseName = ar[1];
    currentState = ar[2];

    // make this button visible
    event.target.buttonSetIcon(this.getField("icon").buttonGetIcon());
    event.target.buttonPosition = position.iconOnly;

    // hide the other button
    var f_parent = this.getField(baseName);
    var f = f_parent.getArray();
    for (var i in f) {
        if (f[i].name != theName) {
            f[i].buttonPosition = position.textOnly;
       }
    }
}

this.calculateNow();    // this line is only required if the status of the
                        // selected button needs to be processed
This script will set the button that you clicked on to use the surrounding circle/oval as it’s button image, and it will remove it from all other buttons in the same group. You may notice that we never actually make assumptions about what these options (or the button names) are – it’s all handled automatically.
This should give you the correct behavior for all the buttons on the group – whatever option you select will be circled. However, if the selection needs to be further processed in your form, we have one more hurdle ahead of us: With a “normal” form that uses radio buttons or checkboxes to indicate a selection, it’s very easy to get the selected value. With our “circle the selected item” form, that is not as simple. Let’s say you want add a text field to the form that should display the value you’ve circled. The following code – when used as custom calculation script for that field – will get the current selection, and will then display it in the text field:
var selection = "";

// get the "Button1" group of fields:

var f_button1 = this.getField("Button1");

var f = f_button1.getArray();

for (var i in f) {
    if (f[i].buttonPosition == position.iconOnly) {
        // get the last part of the field name (e.g. Button1.Opt1 -> Opt1)
        var idx = f[i].name.lastIndexOf(".");
        if (idx > 0) {
            selection = f[i].name.substring(idx+1);
        }
    }
}

event.value = selection;
For this to work, the form needs to be recalculated whenever a button is pushed. This does not happen automatically, that’s why we are calling the ‘calculateNow()’ method at the end of the button action scripts.
Here is a functioning PDF file that has all the scripts in it: circle_button.pdf And here is the Adobe Illustrator file with the oval: circle_button_icon.pdf


Thank you for this code…works great. Is there a way to update / change the code you provided so when the form is being completed the user can click the circle of and on?
Anthony, yes, it’s just a matter of checking to see if the user clicked on the item that was already selected, and in that case turn off the selection. If you need help with the details, you may want to be interested in my professional consulting services. You can find my email address on the “About” page.
Hi Karl
I have been often diverted to your articles when I tend to seek some help on scripting. My observation is that you never seem to hesitate sharing your knowledge and expertise. The least that I can do at this moment is to express many heartfelt thanks for this and many many best wishes for your success.
Thanks
Chmapak, glad I can help. If you are ever in a position to hire somebody for some PDF work, keep me in mind 🙂 And, there is of course the “tip char” button at the top of the page.
Hello Karl,
Thanks, It will indeed be pleasure for me to refer a customer back to you for PDF solution/consulting. At present I can offer you one time free graphic design/photo edits(including fixes to vintage photo) service to you. Since I’ll be doing this in my free time this may take a while. You have my email address. Please don’t hesitate to write back to me for any such assistance.
I also intend to do so in future whenever I seek help from your blogs. It will be indeed a pleasure for me.
Please keep up your good work.